Easter Wreath with Bunny Cake Pan DIY
Looking for a festive and fun way to spruce up your home this season? I have just the thing! Today, I’ll show you how to create an adorable Easter wreath using a vintage bunny cake pan – perfect for adding some rustic charm to your holiday decorations.
Not only is this project incredibly stunning, but it is also super easy to make. So grab your supplies and get ready: it's time to make something totally unique with this DIY Easter wreath with Bunny Cake Pan tutorial.
This blog post contains affiliate links. The opinions are wholly my own from my own experience. I may earn a small commission from clicks through to the websites that end in a purchase.
This post may contain affiliate links at no extra cost to you. *This post is sponsored by Modern Masters. Please see my full disclosure here.
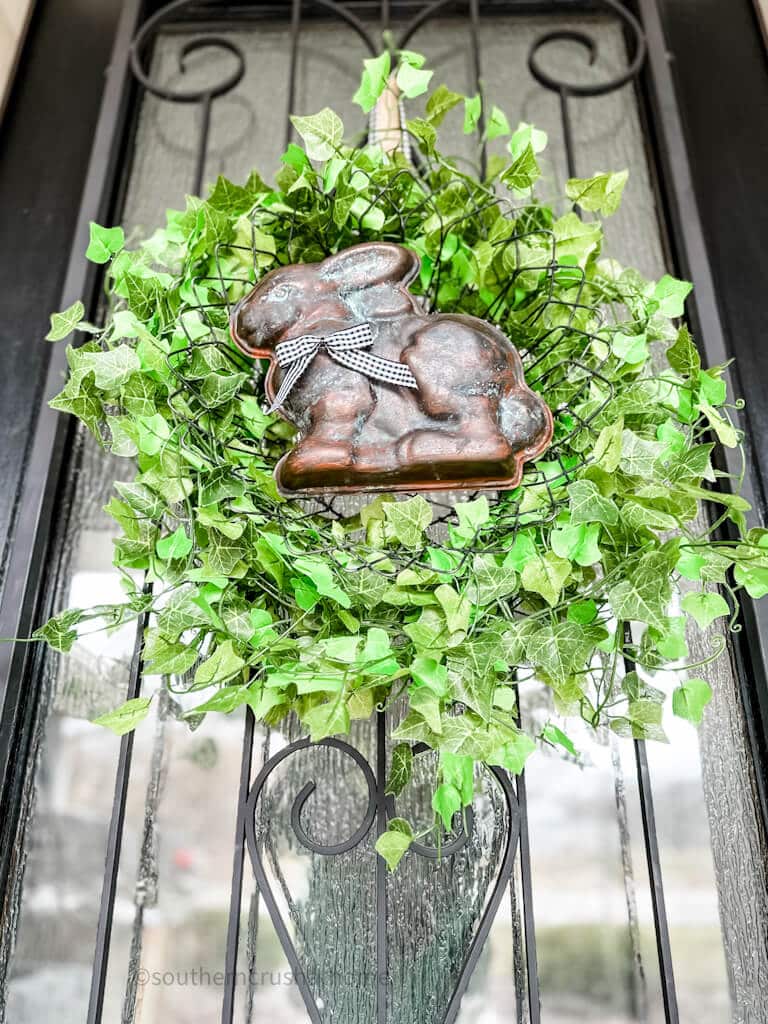
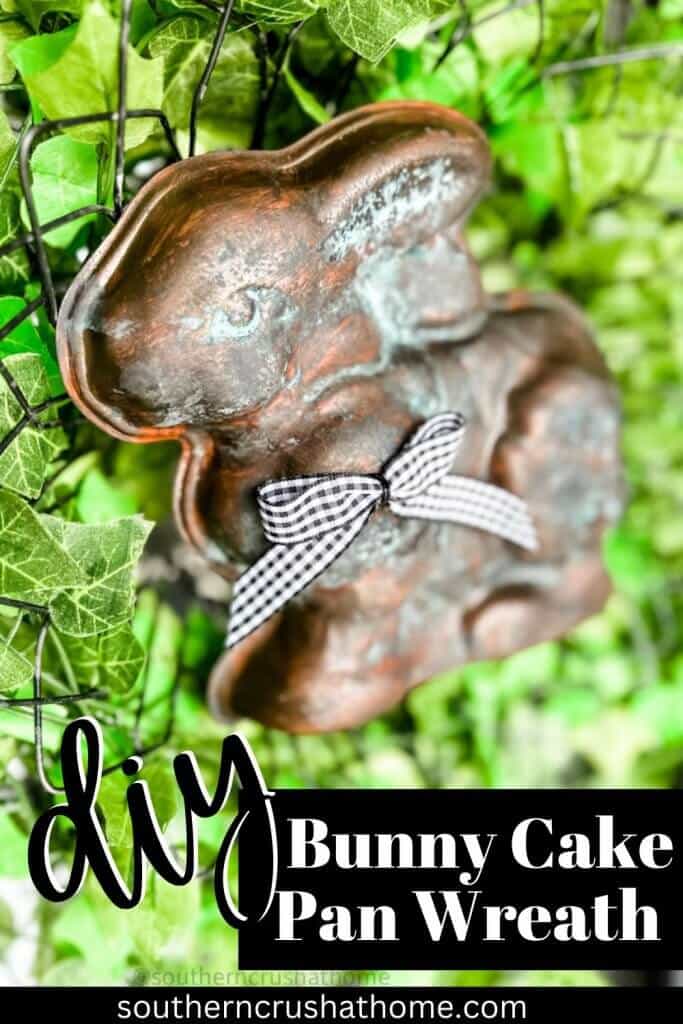
Get ready to amp up your Easter decorations with this easy and fun DIY project! Inspired by my love for the bronze and copper patina look, this festive wreath using an aluminum bunny cake pan came to life.
Supplies Needed to Make This Easter Wreath
- Vintage Easter Bunny Cake Pan
- Modern Masters Metal Effects Patina Kit in Blue Patina
- Foam Brushes
- Metal Wreath Form (mine is from Dollar Tree)
- English Ivy Garland
- Ribbon of your choice
- Hot Glue
- Zip ties
- Styrofoam block

Where to Find Metal Effects Patina Kit
Modern Masters Metal Effects Patina Oxidizing Finish Kit (includes: Primer, Oxidizing Bronze Paint, and Blue Patina Aging Solution) and can be found at these local retailers: Joann – https://www.joann.com/modern-masters-patina-metal-effects-paint-oxidizing-kit-blue/16343238.html Amazon – https://www.amazon.com/Modern-Masters-Effects-Patina-Copper/dp/B000QD9JU8?th=1 The Paint Store – https://www.thepaintstore.com/Modern-Masters-2-Oz-Metal-Effects-Kit-p/30629.htm
@Modernmasters @Rustoleum #modernmasters #modernmasters
How to Make an Easter Wreath
Whether you're an experienced crafter looking for something special to add to your home decor or need something simple and quick, this wreath is sure to make the perfect addition to your seasonal celebrations. Not only does it require minimal supplies, but it's also budget-friendly so you can easily get into the springtime spirit without breaking the bank. So grab your bunny cake pan, glue gun, and some ribbon – let's get crafting!
Patina Bunny Cake Pan Instructions:
Step One
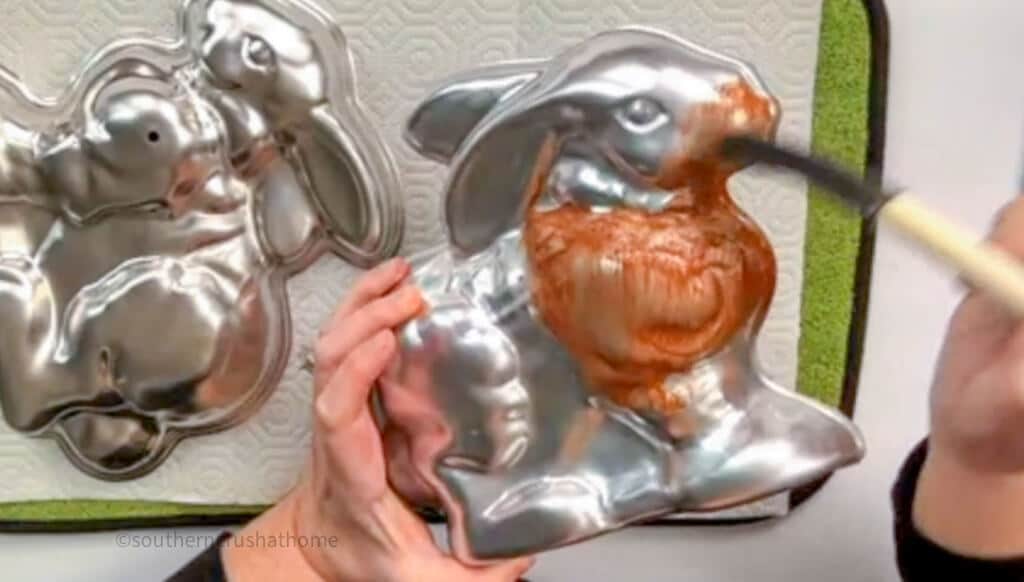
Apply the first coat of Metal Effects Primer by Modern Masters. Apply with a sponge applicator in thin, light strokes to cover the entire bunny cake pan. Allow to dry for at least 30 minutes.
Step Two
Apply a second coat of Primer. This time allow for a generous layer to fill in any missing areas of the first layer. Allow to dry for at least 30 more minutes.

Step Three
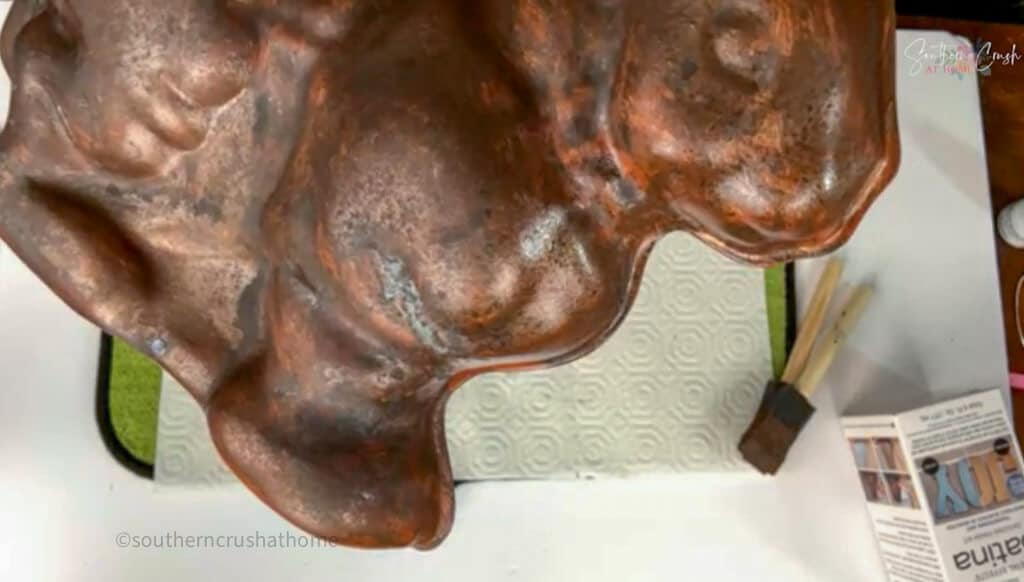
Using a new sponge brush, apply a first coat of the special oxidizing bronze paint. This is where the aluminum vintage bunny cake pan turns into a more high-end metal-looking easter decoration. Allow cake pan to dry for another 30 minutes.
Step Four
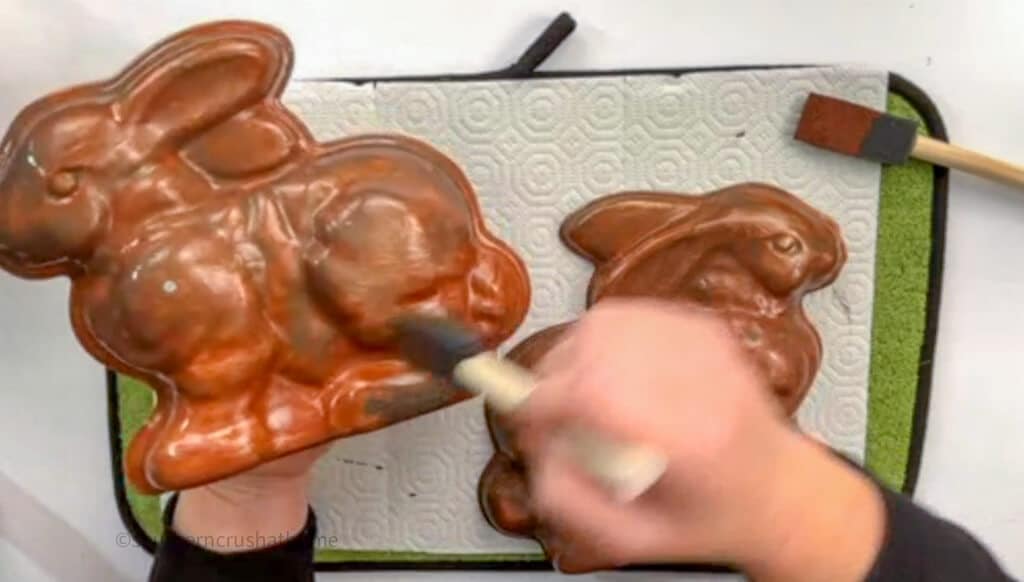
For the final coat of bronze paint, apply in small sections at a time.
After applying a few strokes of paint, spritz the blue patina aging solution over the wet paint area.
Get creative and experiment by varying the sprays of the aging solution from a light, airy spray at a distance to a closer more concentrated spray that leaves pretty drip marks behind.
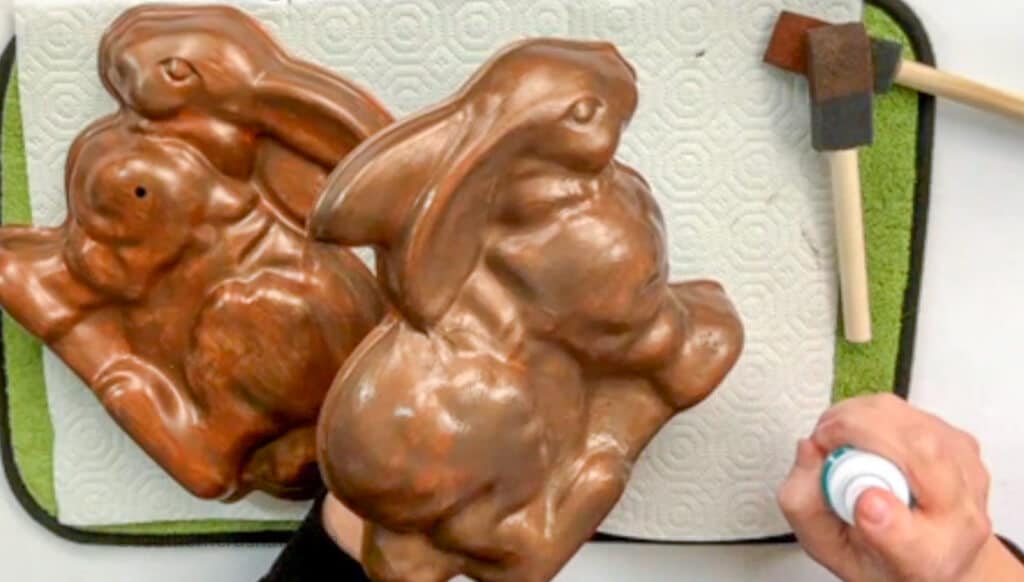
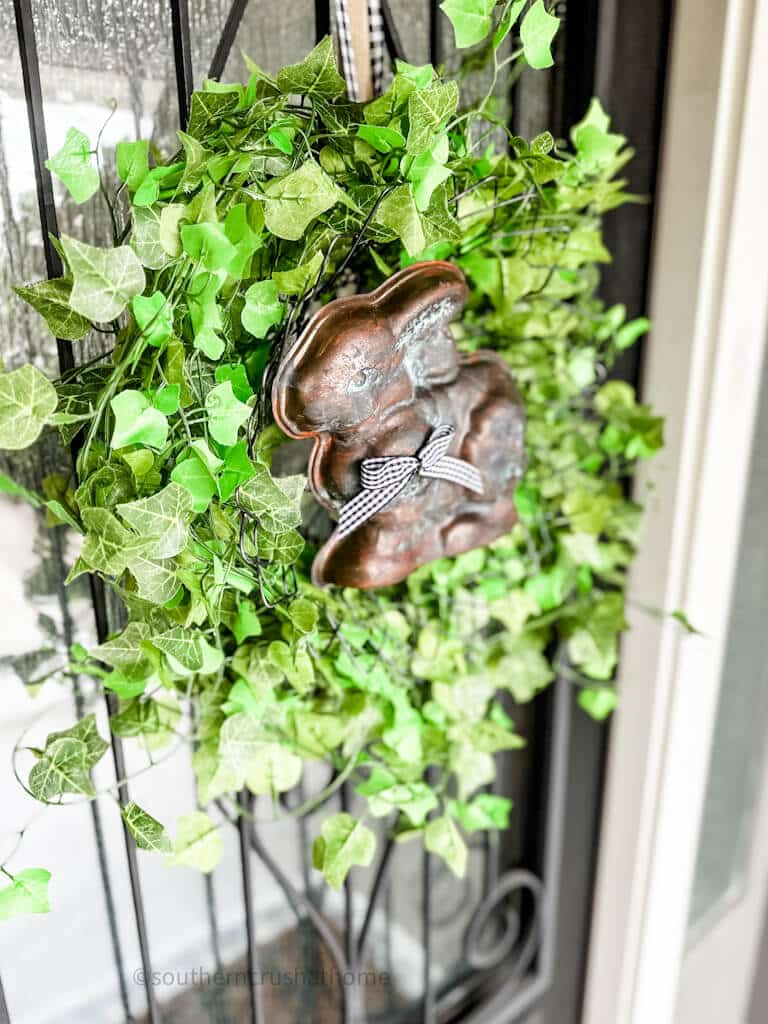
This is where the magic happens. As the patina aging solution dries, it will begin to change the bronze paint into an aged patina!
Easter Wreath Assembly Instructions:
Step One
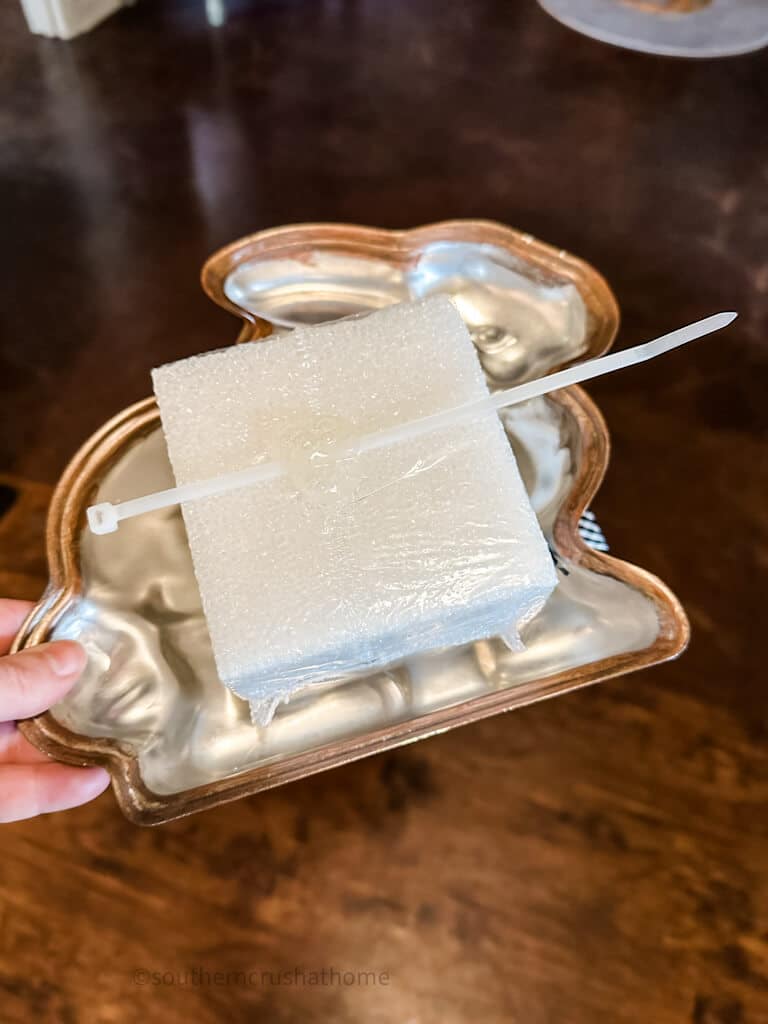
Hot Glue a styrofoam block to the inside of one half of the bunny cake pan.
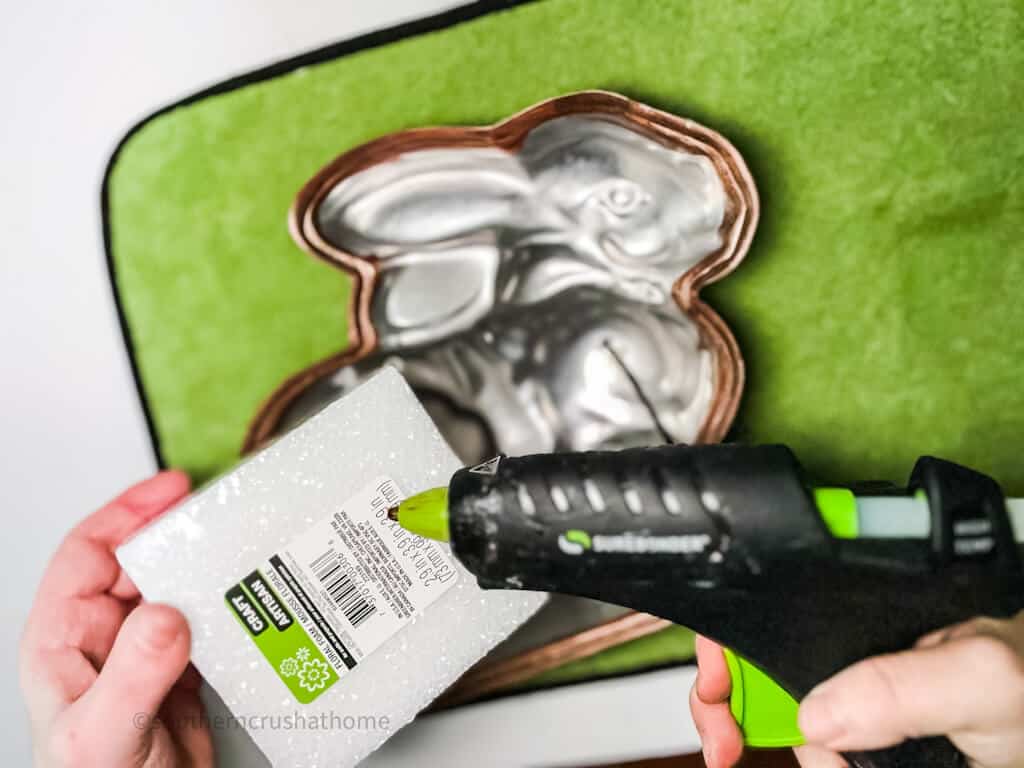
Then hot glue a zip tie to the block.
Step Two
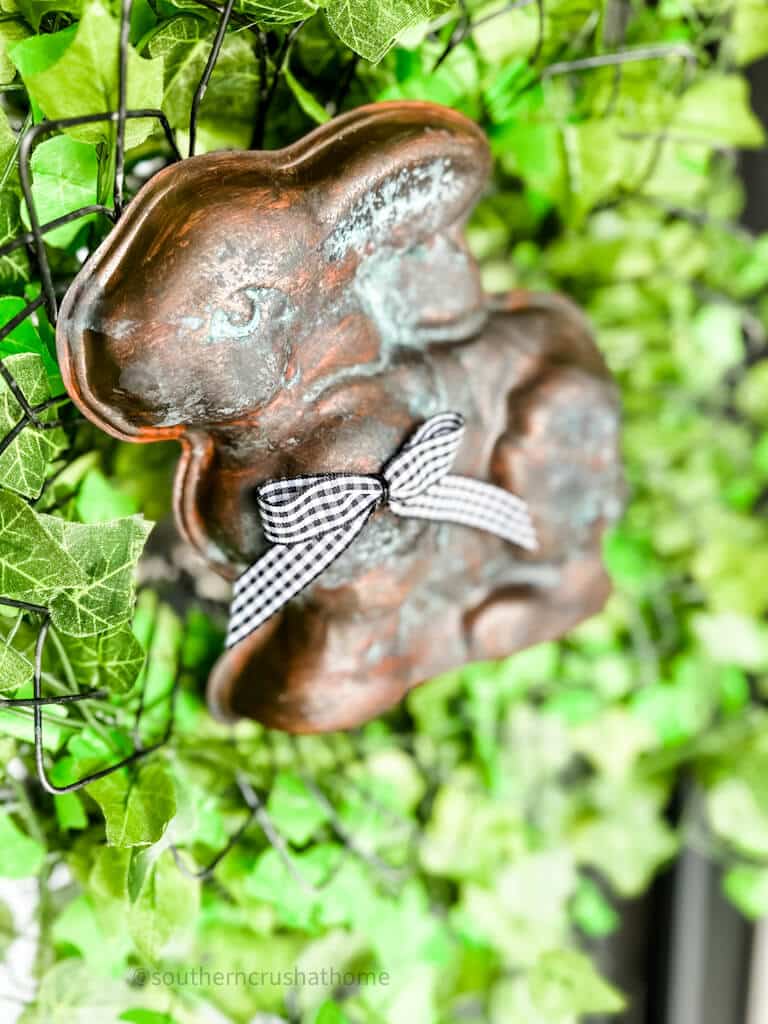
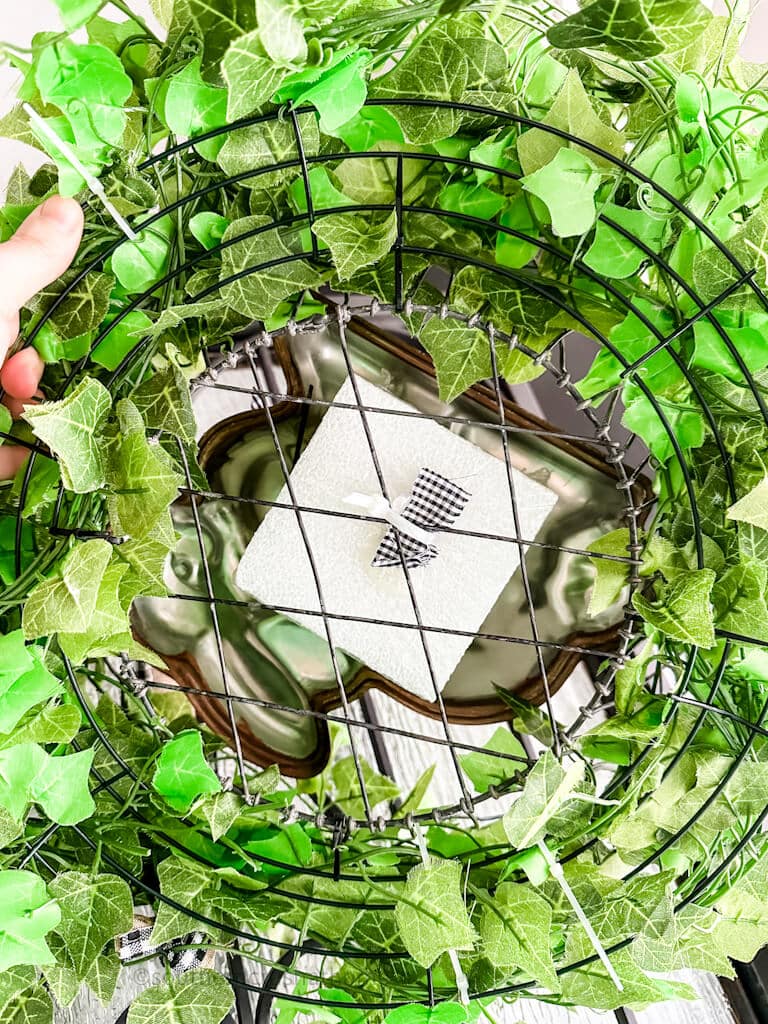
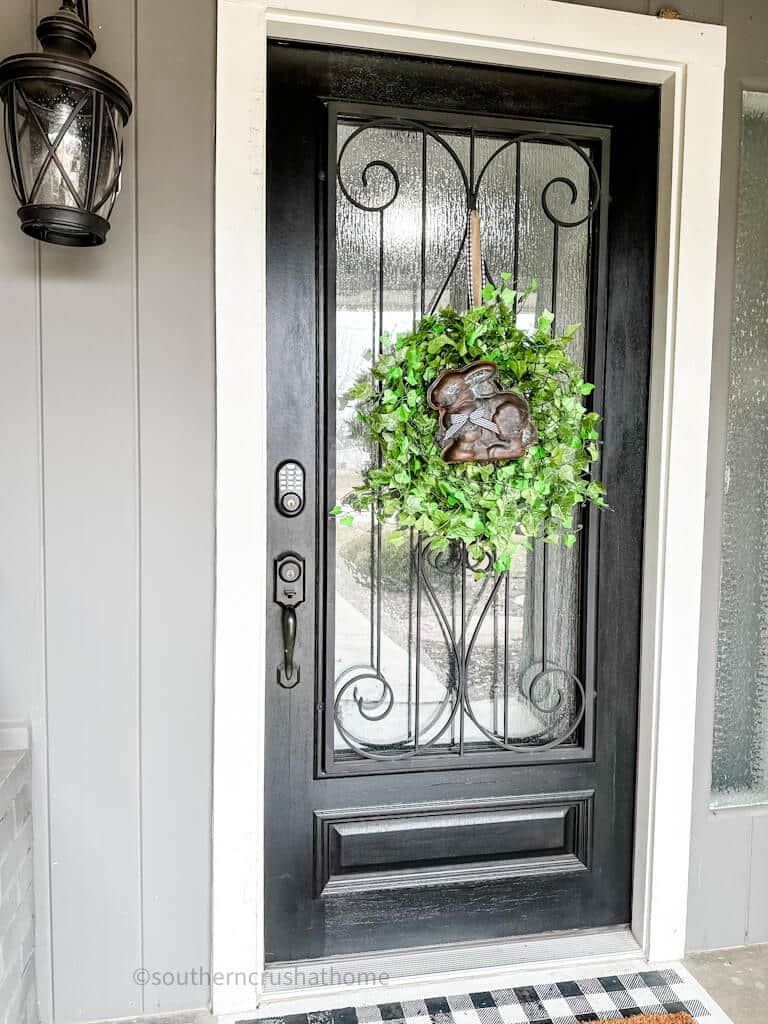
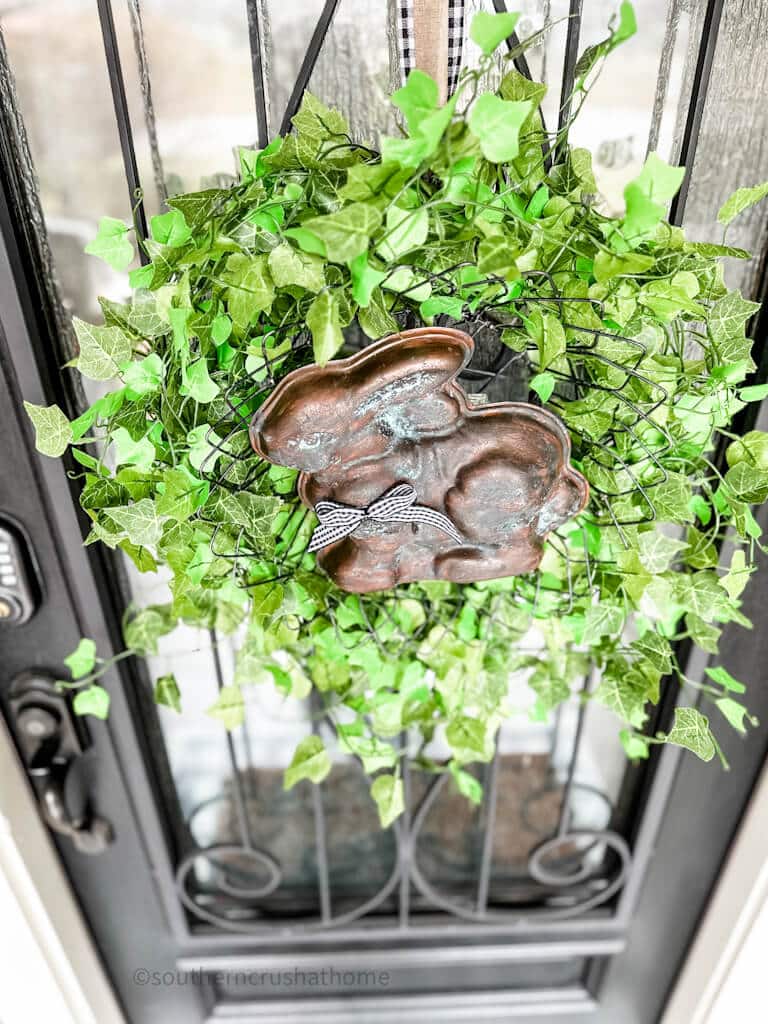
Attach the English Ivy or greenery garland around the metal wreath frame using zip ties and then attach your new bronze patina Easter Bunny cake pan in the center of the wreath. (I also added a metal basket to the center of my wreath.)
Step Three
Add a coordinating ribbon to hang the wreath on your front door.
So transformative and amazing!
What do you think? Will you try this?
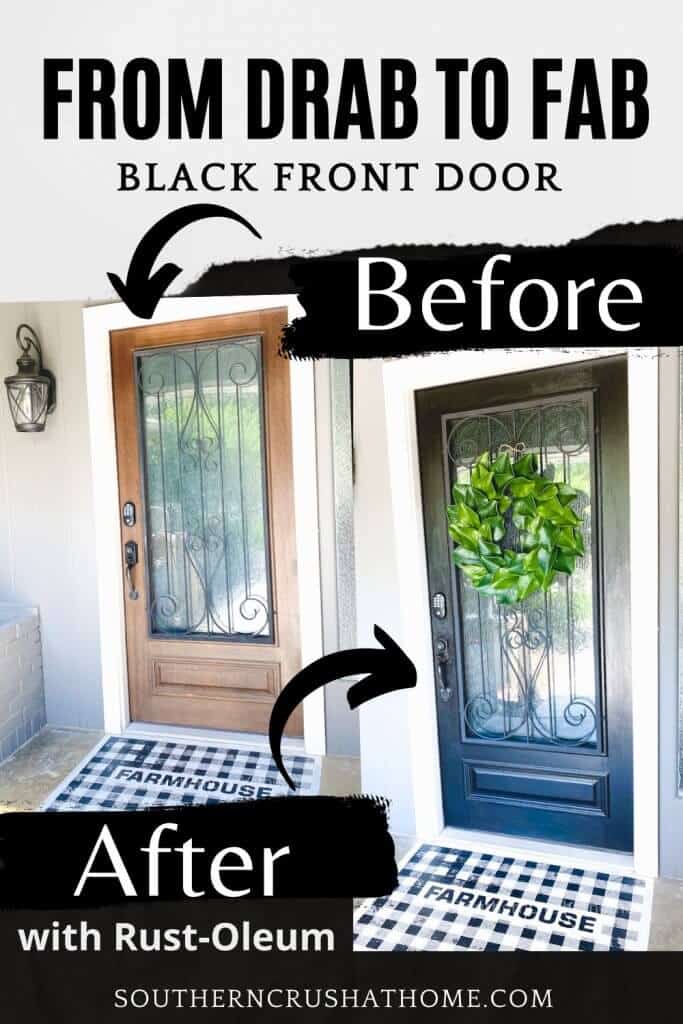
Did you see the post where I shared how to transform your front door in an afternoon? I'll share it again below in case you missed it.
Display Your Easter Wreath
There are a lot of options when it comes to displaying this fun and unique Easter wreath. The most obvious way is to hang it, like I did, on your front door as gorgeous front door decor.
Here are a few more ideas for displaying your wreaths:
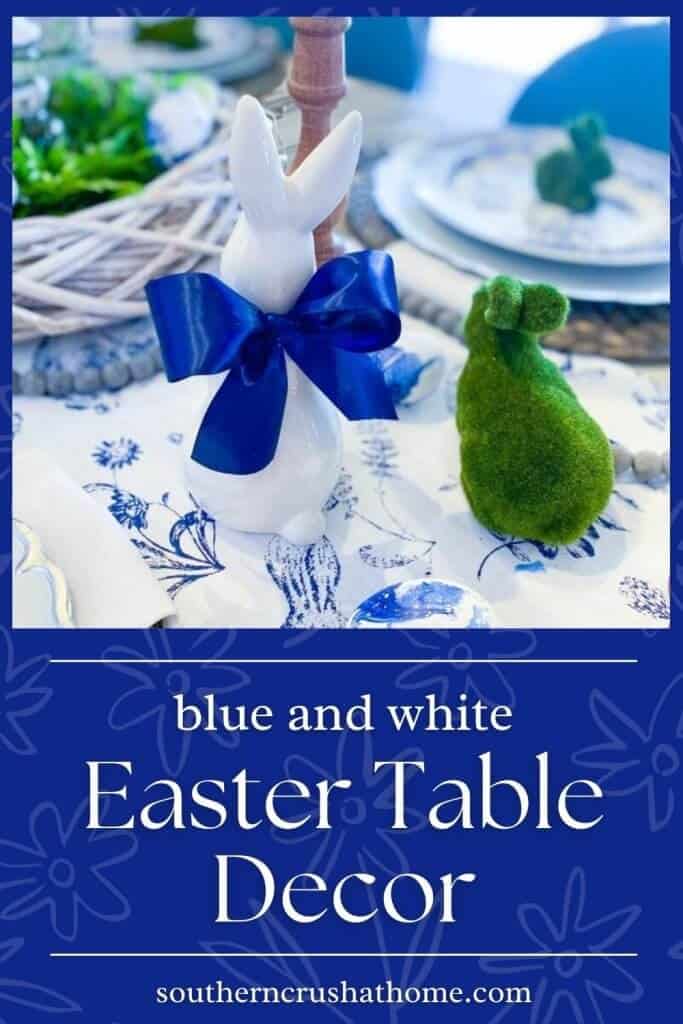
- Use it as a table centerpiece (see more inspiring Easter table ideas HERE)
- Place it on a buffet table or side table
- Hang it over a fireplace mantle
- Put it in a large tobacco basket and hang it on a focal wall
- Frame it in a picture frame as part of a whimsical farmhouse gallery wall
More Easter Decorating Ideas
Need more Easter decoration inspiration? How about these super easy, fun ideas you can create on a budget while making your home a place for the whole family to get into the holiday spirit?
From table setting ideas, cute bunny crafts, and farmhouse Easter banners, to decorating Easter eggs, there is something here for every skill level.


Celebrating Easter
It's the time of year when families gather in hopes of new beginnings, fresh starts, and celebrating loved ones. One of my favorite ways to welcome the season is by creating a beautiful homemade Easter wreath like this one.
Curious as to when is Easter this year. Find the answer to that question and more in this article on Everything you Need to Know about Easter.

If you’ve ever thought about making your own decorations for holidays or gatherings but weren’t sure where to start, this simple craft project will be perfect for you. With its easy-to-follow instructions, you'll end up with a one-of-a-kind Easter wreath that can proudly take center stage among your Easter decorations – ready to share smiles all around!
Be sure to PIN this fun project for later!
Easter Wreath with Bunny Cake Pan DIY
Materials
- Vintage Easter Bunny Cake Pan
- Modern Masters Metal Effects Patina Kit in Bronze
- Foam Brushes
- Metal Wreath Form
- English Ivy Garland
- Ribbon of your choice
- styrofoam block
- hot glue gun
- zip ties
Instructions
Patina Bunny Cake Pan
- Apply the first coat of Metal Effects Primer by Modern Masters. Apply with a sponge applicator in thin, light strokes to cover the entire mailbox. Allow to dry for at least 30 minutes.
- Apply a second coat of Primer. This time allow for a generous layer to fill in any missing areas of the first layer. Allow to dry for at least 30 more minutes.
- Using a new sponge brush, apply a first coat of the special oxidizing bronze paint. This is where the aluminum vintage bunny cake pan turns into a more high-end metal-looking easter decoration. Allow cake pan to dry for another 30 minutes.
- For the final coat of bronze paint, apply in small sections at a time.
- After applying a few strokes of paint, spritz the blue patina aging solution over the wet paint area.
Wreath Assembly
- Attach the English Ivy or greenery garland around the metal wreath frame using zip ties.
- Place your new bronze patina Easter Bunny cake pan in the center of the wreath.
- Add a coordinating bow to the wreath using a zip tie.