Classic DIY Buffalo Check Doormat (Painted Concrete)
Check out how easy it is to make your own layered doormat by painting your concrete. This Classic DIY buffalo check doormat looks great in farmhouse chic decor. When you own an older home, cracks just come with the territory. And when it comes to my front porch, cracks are aplenty! Usually, an easy fix is to just throw down a doormat down each season to cover them up. Not this time though. Instead, I decided to paint a DIY buffalo check layered doormat and it’s the perfect solution for covering cracks on my front porch! Layering a doormat is trending and this painted doormat is a great option as the base for my layered doormat look.
>>>BE SURE TO PIN THIS FOR LATER!<<<
What Is A Buffalo Check Doormat?
This checkered pattern is also called Queen Charlotte's check. It's a two or three-colored striped pattern that creates large squares that are all the same size. This is not the same as checked gingham fabric as gingham has small squares. The rug I made is a black and white buffalo checked pattern and I absolutely love it!
How To Make A DIY Buffalo Check Doormat
This is a cute rustic doormat that will fit into almost any decor theme. It's really easy to customize- just use a different stencil and paint color. Here's the entire tutorial, along with the supplies and step by step instructions.
Supplies Needed to PAINT BUFFALO CHECK DOORMAT
Here's what you need from the store.
- Exterior Acrylic Paints
- Painters Tape
- Stencil Brush
- Pencil
- Stencil of Choice
- Measuring Tape
You can always “shop the project” and find them all here in my Amazon Shop for your convenience.
DIY Buffalo Check Doormat PAINTING Instructions
Here's how to make the doormat, along with all the ways you can change it up and customize it. To do it, you'll actually be painting the checkered pattern directly to your porch.
1. Tape Off A Section of the Porch
Use painter's tape and tape off a section of the porch for the mat. I was careful to measure in order to make sure it would be large enough to put a second mat inside and still leave a couple of inches showing around the edges.
2. Clean The Area
Next, prepare the area you taped off. Clean your surface thoroughly from dirt and debris. Sweep it and then wash it down with some water too. 
3. Paint the Surface Within the Tape
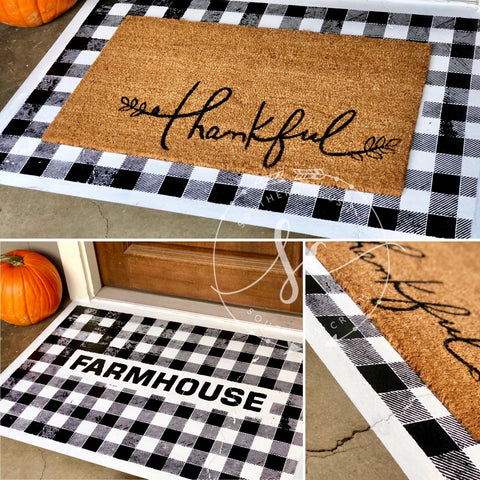
After that, I painted the surface within the tape as the base of the doormat with the white acrylic paint. I taped down the farmhouse stencil in the middle of the large, white square and proceeded to add the buffalo check stenciling all the way around it, tamping down my stencil brush with the black acrylic paint making sure to overlap the buffalo check pattern as I went was the hardest part of the entire project! (Oh, that and waiting for the paint to dry—lol).
4. Add Finishing Touches
Finally, I went back and filled in the farmhouse stencil in the center and removed all of the blue painters tape to reveal the newly painted DIY doormat. I made a small mistake on one side of the mat where the line was a little crooked. I decided that it makes the project look a little more “hand-painted” and unique, lol.
WATCH THE DIY Painted Doormat Video Tutorial HERE
If you happened to miss the live video on Facebook or prefer to watch the process on video; the entire video tutorial is above for your convenience.
Add Different Doormats On Top
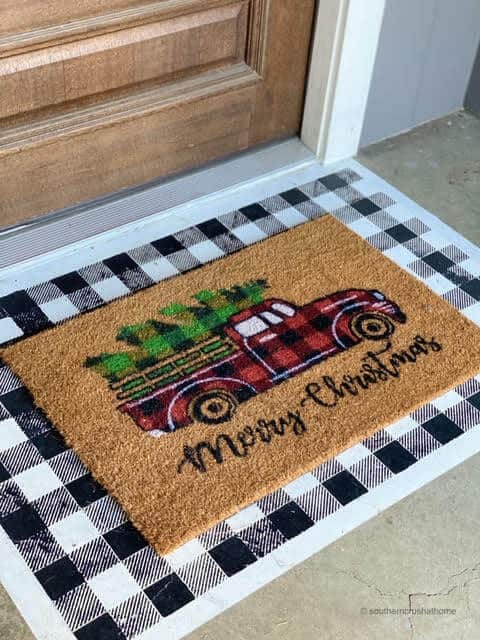
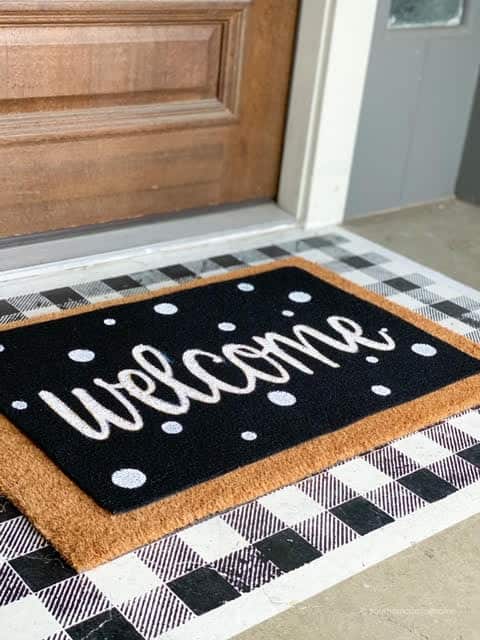
This project turned out great and I added the “thankful” mat on top, but it’s also super cute to change it out with the seasons or leave it with just the farmhouse in the middle, too! Every time you add a different doormat, it completely changes how your porch looks. I love how the buffalo check pattern makes the area in front of my door pop!
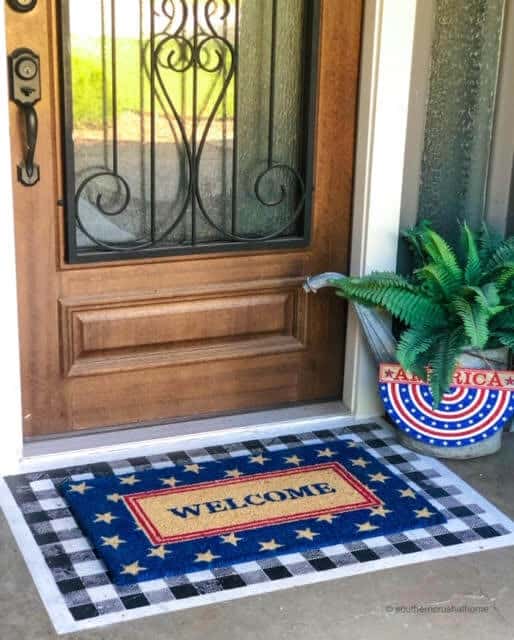
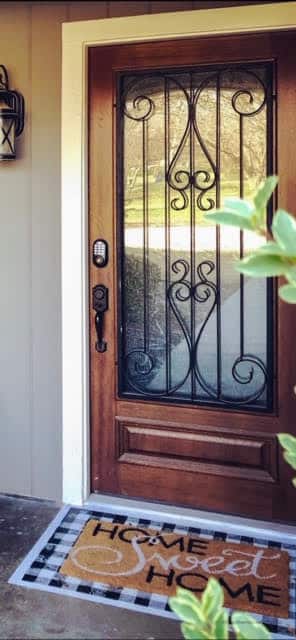
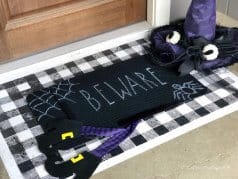
Buffalo Check Doormat Seasonal Ideas
Want some more ideas? Here are some different mats I added on top of the painted buffalo check pattern. Each mat makes it look completely different.
I truly hope that y’all try this on your front porch. Disclaimer: This project included all of my porch’s current cracks. I think they added character, don’t you? See below. 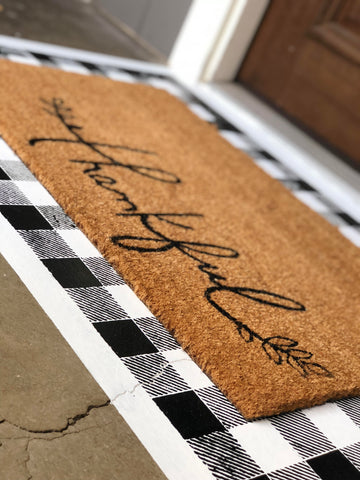
DIY Buffalo Check Doormat Tips
As I made this I discovered a few tips that I think will help you out too. First, turn on some music or listen to a podcast. This is not a quick project. It takes time to paint the squares inside the stencil. Next, use a thick round brush and dab the paint off of it before you use it. If you use too much paint on your paintbrush, it will cause the paint to seep underneath the stencil. The nice, crisp lines in the buffalo check pattern are tough to do with a paintbrush, but the way to do it is by using only a little bit of paint at a time. Finally, dab the paint onto your surface, don't rub the paintbrush back and forth. By dabbing, you are keeping the lines nice and crisp! Leave your thoughts below in the comments, please… BTW— Life is short—Enjoy the mess!
Share This Post
There are so many different ways to make this painted doormat. Don't forget to pin this post so you can find it later.
Sign Up For Emails
If you love this kind of DIY project, you need to be getting my emails, friends! Each week I send out a couple of emails that include updates, crafts, shopping experiences, and decor inspiration. Be sure to get yourself signed up below. I can’t wait to meet you!
More Home Decor Crafts
If you enjoyed this tutorial, you should join our Facebook Page to see more fun projects “LIVE”. Here are some more projects I think you'll enjoy too. You should also check out my most recommended DIY Dollar Tree Craft Supplies!
- How To Make and Use DIY Chalk Paint
- How To Make A DIY Tulle Bow
- Dollar Tree Decor With Ceramic Paint
DIY Buffalo Check Doormat (Painted Concrete)
Materials
- Exterior Acrylic Paints
- Painters Tape
- Stencil Brush
- Pencil
- Stencil of Choice
- Measuring Tape
Instructions
- Tape off a section of your porch with the painters tape.
- Clean the area thoroughly.
- Paint within the lines of the tape using your stencil.
- Remove the tape and use a brush to correct any areas that didn't get painted.
- Decorate for each season!
Melanie, I love this!
Thank you so much!!
Love this ?
Thank you
It’s called “layering”. Isn’t it fun? Most people layer several rugs on top of one another, I decided to paint my first rug instead. I added the stenciling so that I would always have the “option” to display only the first rug. Don’t you just love having options?
I like layering even more now … and I won’t trip on the 1st layer! Thank you, it’s a great idea. I will keep mine simple since I’m in a condo. Thanks for the motivation. You did a fine job. Cute would be good-nuff for me! ;~)
That’s an awesome way to look at it for sure!!! Thank you so much
Love this, where did you get the buffalo check stencil? Thanks.
I got mine from this site https://www.funkyjunksoldsignstencils.com/products/buffalo-check
However; I’ve more recently found this one that is actually more user friendly https://amakersstudio.com/#a_aid=815243
Totally love this fabulous idea! Intend on copying it — including the check pattern!
Wow! Thank you and I’m so glad you’re trying it for yourself!!!
love your porch
Why thank you! I appreciate it
Love this! What a great idea!
This is one of my top diys to do!
This is a wonderful idea!!!
This looks beautiful Melanie! Love the painted idea underneath the real deal!
thank you! I used the same stencil as seen on this post…Repurposed Headboard Garden Sign (with Buffalo Plaid Stencil)