Make Adorable Wooden Spatula Gift Tags With This Dollar Tree DIY
Get ready for one of the cutest Dollar Tree crafts! Today I'm showing you how to make wooden spatula gift tags perfect for holidays, birthdays, or even to attach to a wood bead garland. So pick up some wooden spatulas on your next Dollar Tree visit. You will definitely want to make these!

Be sure to PIN this for later!
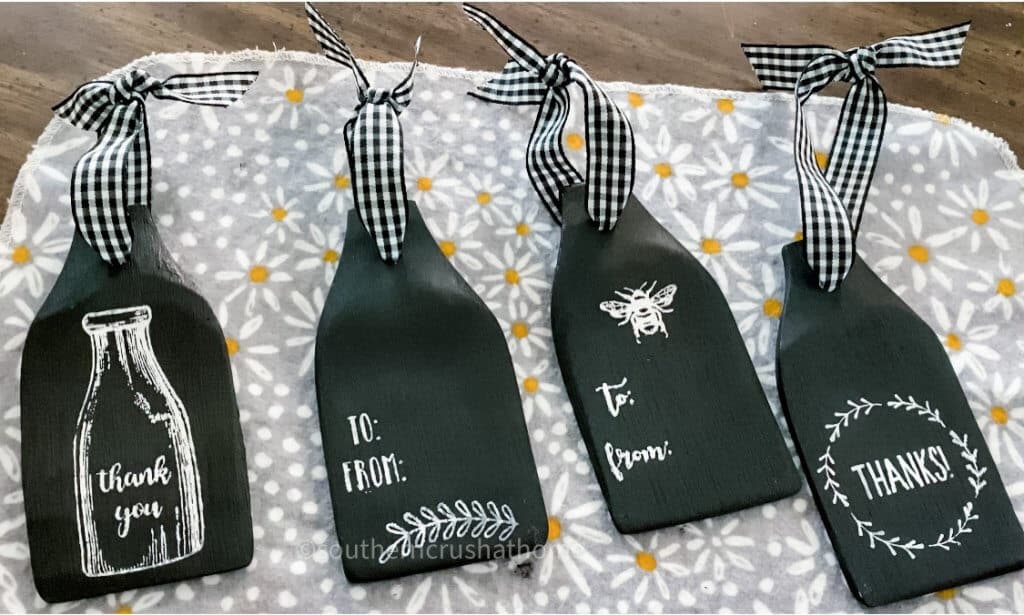
We all love a good Dollar Tree craft, right? Well, these wooden spatula gift tags may be one of my favorite Dollar Tree crafts yet! The cute factor is just off the charts. Plus, they serve a purpose. Attach them to gift bags, presents, or even use them as Christmas ornaments with a seasonal quote. I could totally see these being given as teacher or co-worker gifts too! Get creative!
Let's get to this easy DIY tutorial, so you can make your own.
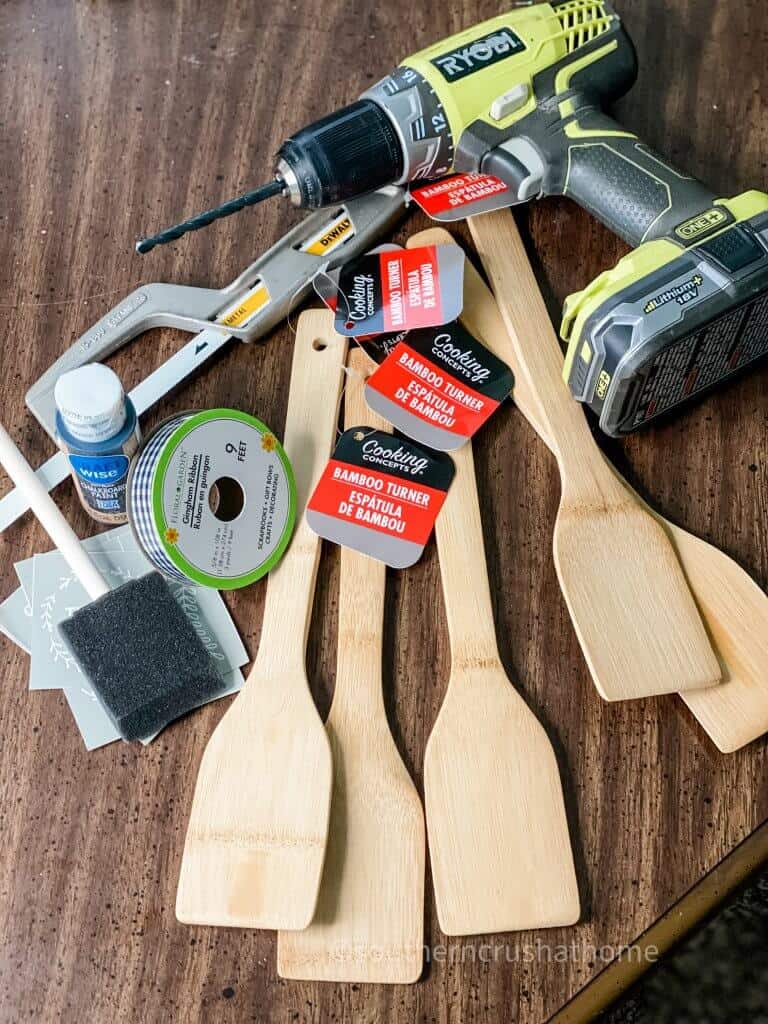
SUPPLIES needed for Wooden Spatula Gift Tags
All the supplies needed can be found HERE in my Amazon Shop!
- Wooden Spatulas
- Chalkboard Paint
- Buffalo Check Ribbon
- Chalk Paste
- Mini Squeegee
- Adhesive Stencils
- Ryobi Drill
- Hand Saw
Start by using 1'4″ drill bit to drill a hole where the base of the spatula meets the handle.
QUICK TIP: I did this part over the trash can to catch all of the shavings.

Score the end of the handle where you are going to cut it by using a straight edge razor.
Next, use a small hand saw to cut the wooden spatula. where you marked it. Trust me, it's super easy!
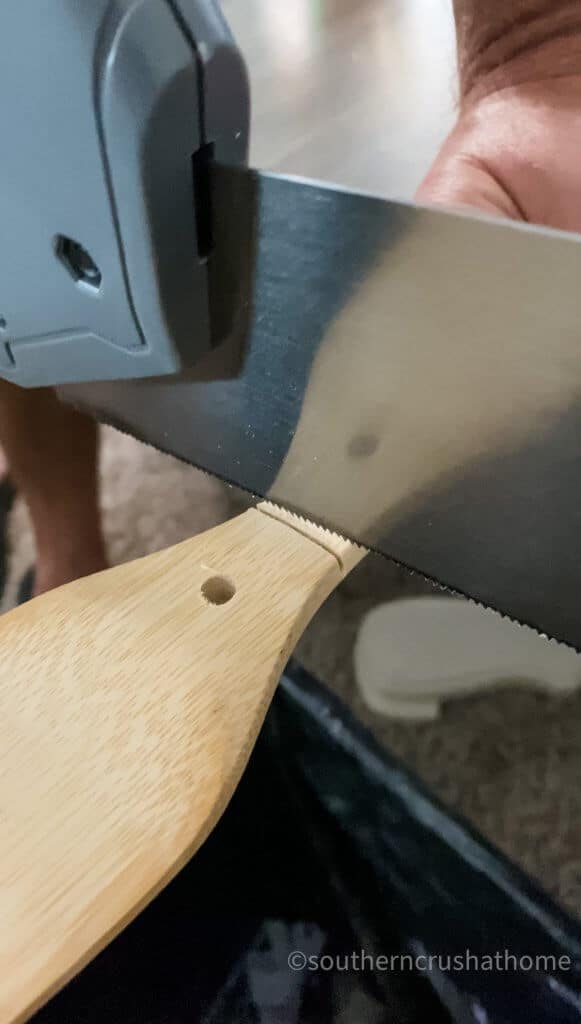
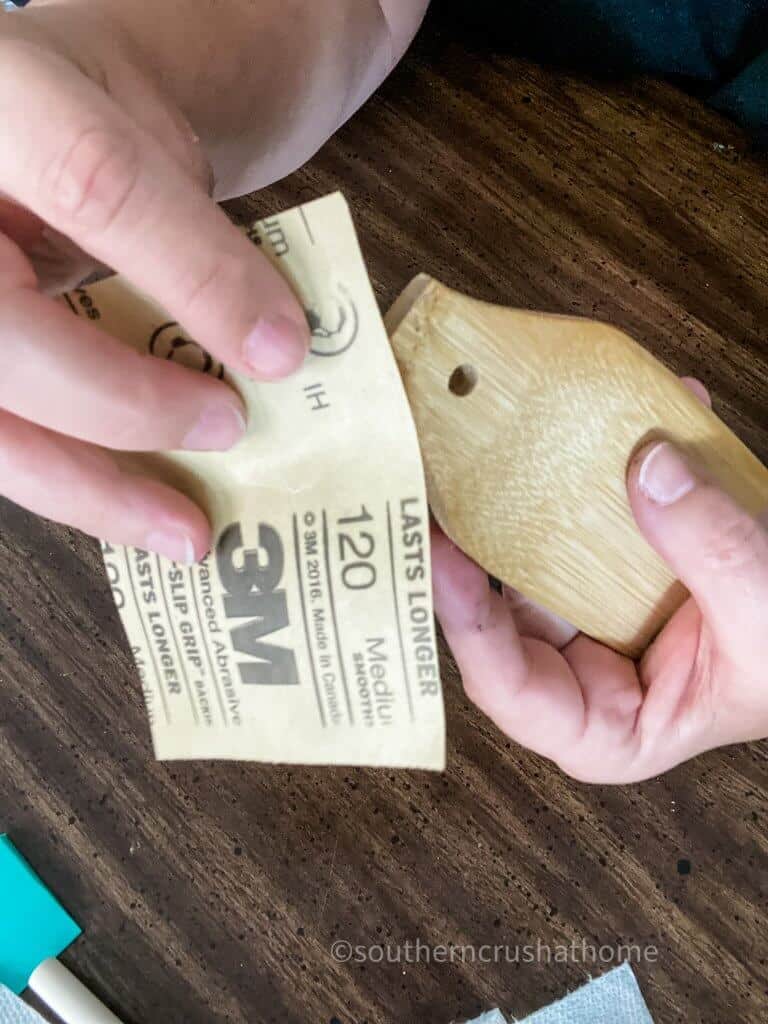
The edge will be rough, so be sure to use 120 grit sand paper to sand the rough edges.
How to make Wooden Spatula Gift Tags
Now it's time to paint. Give each wooden tag about 2-3 coats of black chalkboard paint, letting it dry in between coats. To speed up the drying time, use a heat gun.

NEXT…
Choose the stencil that you want to use and place it on the tag. Place a little bit of chalk paste on the squeegee and cover the stencil with the paste. You really only need a little bit of paste for these silk screen transfers.
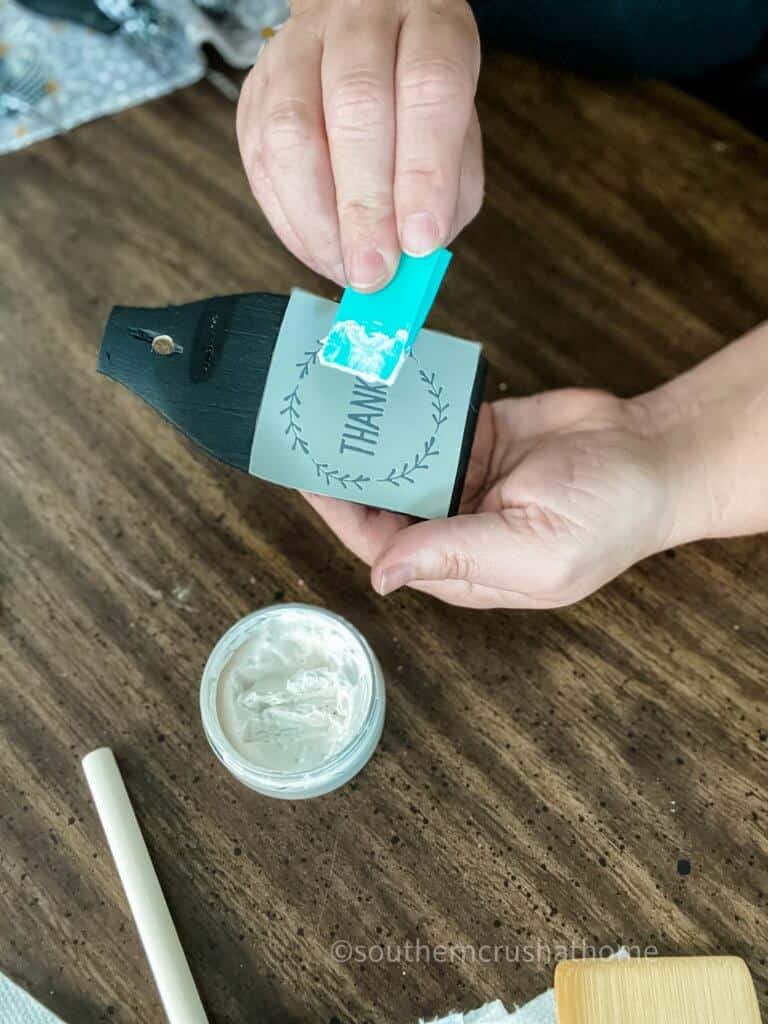
The best part is they are reusable! Scrape any unused paste back into the jar. Slowly remove the transfer and you have a beautiful finish, with no bleeding! Use the heat gun again to dry it quickly.
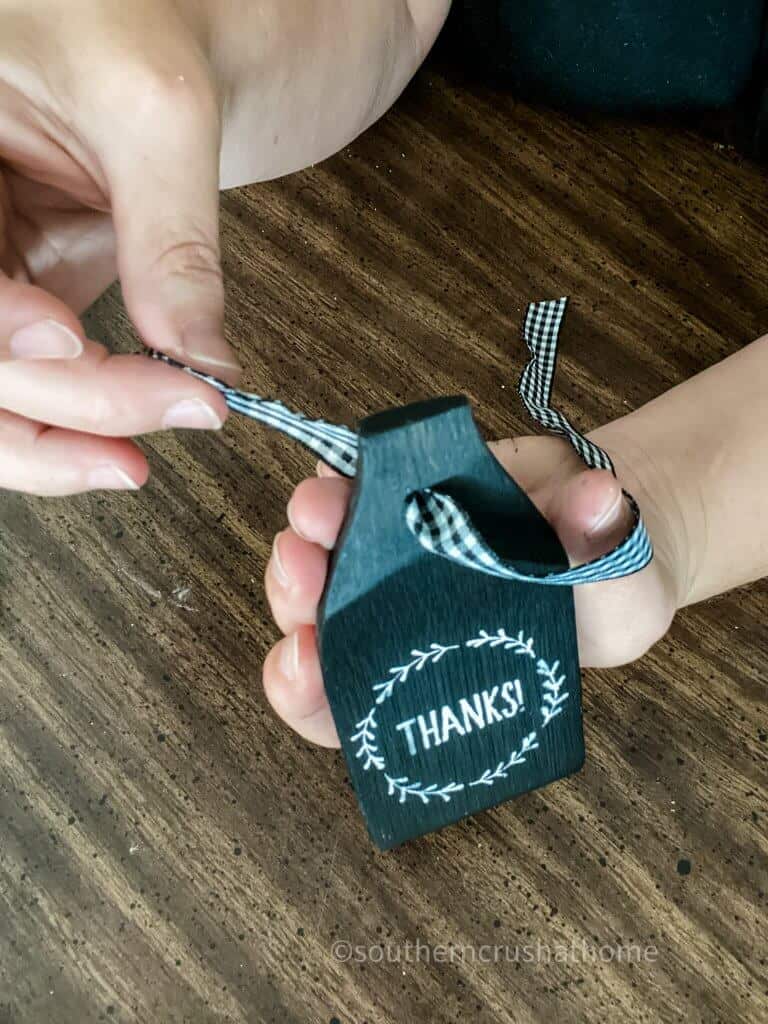
Add a pretty ribbon of your choice to the hole you made in the gift tag. You know I love buffalo check, and it really looks gorgeous with the black and white.
that's it!
Get creative! There are all kinds of greetings you can add for birthdays, anniversaries, really anything you can think of. Aren't these the cutest? Let me know if you make some!
 Be sure to PIN this for later!
 Be sure to PIN this for later!
I totally want to add one to the end of my farmhouse style wood bead garland. I bet it will look so pretty!
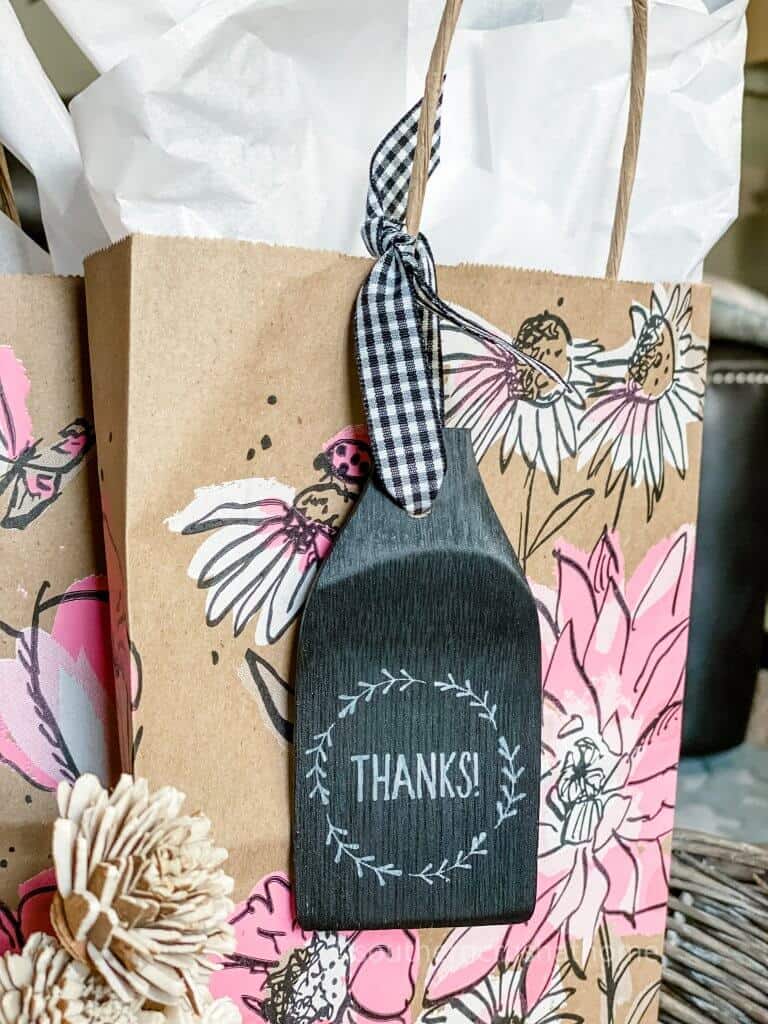
Think about all the ways you can use these sweet little tags. I just love how this one looks on a gift bag.

I hope you enjoyed this simple DIY. Please let me know if you make your own wooden gift tags. Leave me a comment below and share pictures of your finished tags!
step by step video tutorial
If you want to see the exact step by step process, be sure to check out this video tutorial below over on my YouTube Channel!

BE SURE TO CHECK OUT THESE OTHER DOLLAR TREE DIY IDEAS!
- Cricut Dollar Store Halloween DIY
- Dollar Tree Stamped Terra Cotta Pots
- Black and White Pumpkin Ideas

Make Adorable Wooden Spatula Gift Tags With This Dollar Tree DIY
Equipment
- Hand Saw
- Drill
Materials
- Wooden Spatulas
- Chalkboard Paint
- Buffalo Check Ribbon
- Chalk Paste
- Mini Squeegee
- Adhesive Stencils
Instructions
- Start by using 1'4" drill bit to drill a hole where the base of the spatula meets the handle.
- Score the end of the handle. Use a hand saw to cut the wooden spatula.
- Use 20 grit sand paper to sand the rough edges.
- Give each wooden tag about 2-3 coats of black chalkboard paint.
- Choose the stencil that you want to use and place it on the tag.
- Place a little bit of chalk paste on the squeegee and cover the stencil with the paste.
- Scrape any unused paste back into the jar.
- Slowly remove the transfer.
- Add a pretty ribbon.
3 Comments