How to Hang a Tree Swing
There's something about a tree swing that just brings out the kid in everyone. If you're looking to add one to your yard this summer, here are some tips on how to hang a tree swing safely and securely as well as how to hang a tree swing without a branch.

PIN this for later!
Trees and tree swings. I think they are both amazing! They hold so much history (my favorite thing), loads of memories, and lots of secrets!
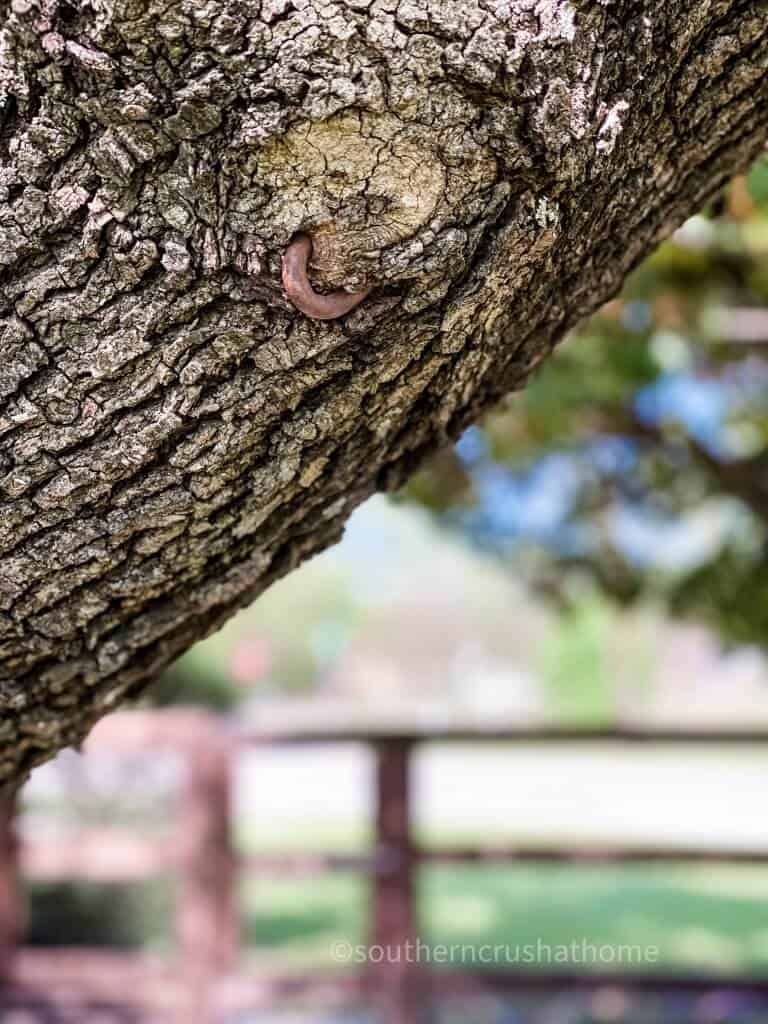
For instance, what secrets do you think this link of chain I found in our large tree is keeping? I've literally made up a ton of different stories in my own imagination… how about you?
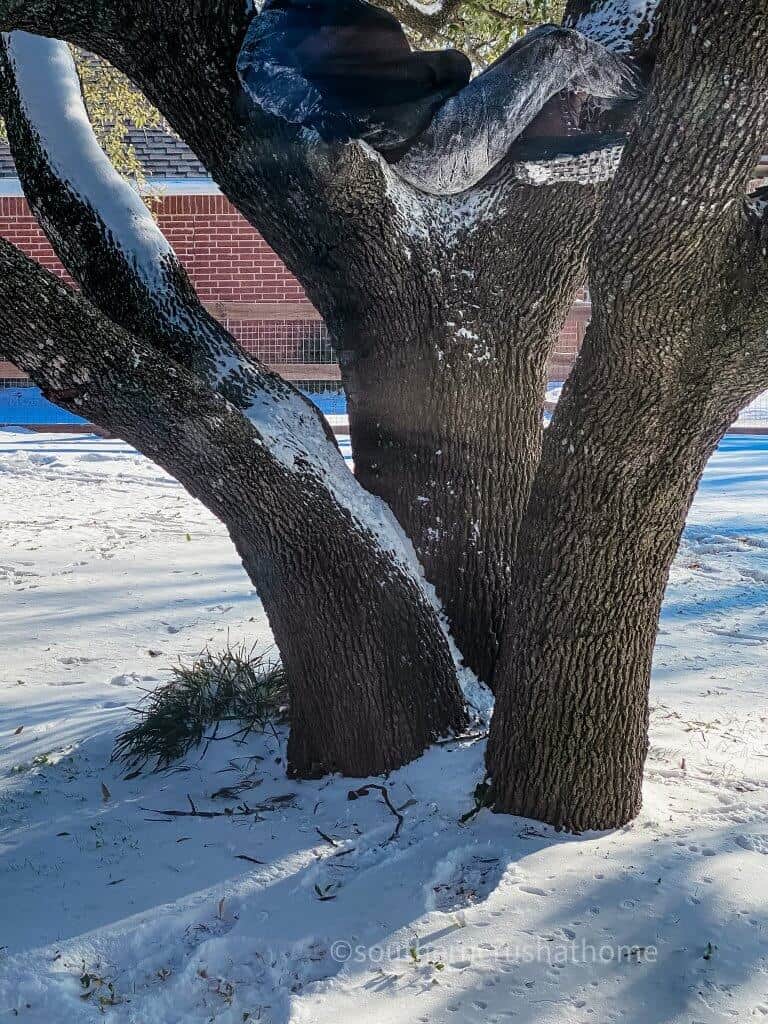
My kids like to climb up in our biggest tree to simply “get away from it all”. They will spend hours daydreaming up in the branches. Especially on snowy days.
Whether you're looking for a spot to relax after a long day or you want to provide your kids with some outdoor fun, a tree swing is a perfect addition to any backyard tree!
But how do you go about hanging one? Here are some tips to help get you started.
This blog post contains affiliate links. The opinions are wholly my own from my own experience. I may earn a small commission from clicks through to the websites that end in a purchase.
Supplies Needed to Make a DIY Tree Swing
- Scorch Marker
- Cricut
- Sander
- Rope
- Gray Chalk Paint
- White Chalk Paint
- Sponge Brush
- Chains and carabiners if the tree branch is uneven
If you'd prefer to purchase a tree swing, here are some great Amazon tree swings

Using My Old Tree Swing
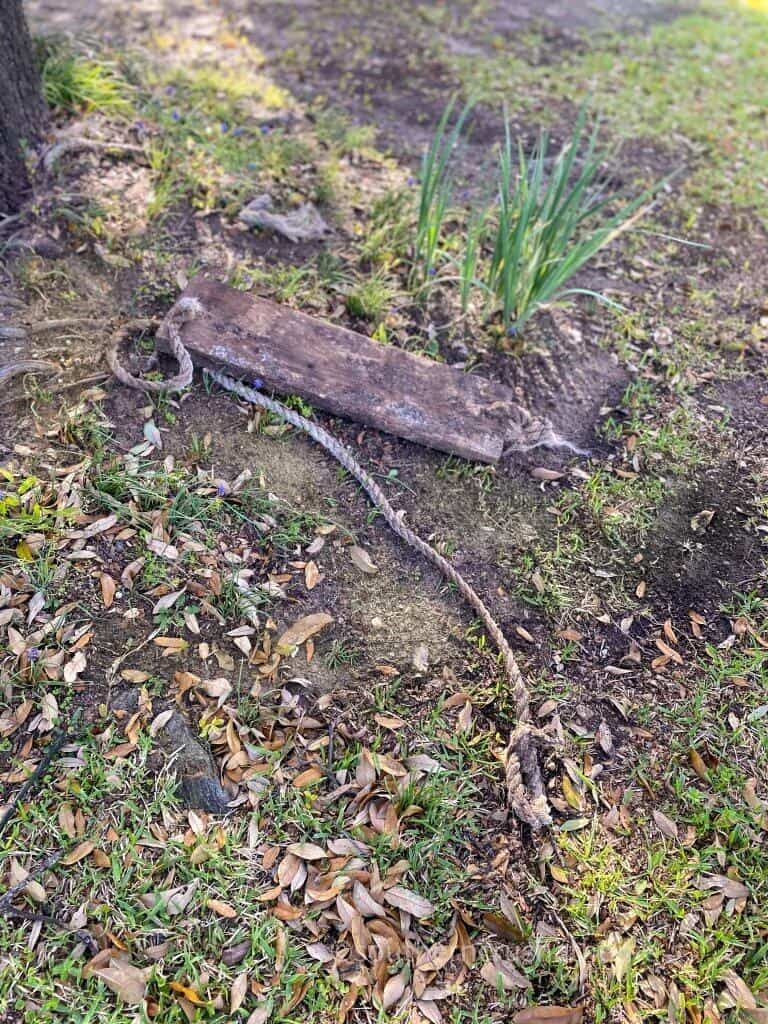
This is the poor state of my old tree swing. It was time. She had lived her best life and then sat on the ground rotting for quite some time.
The rope was too far gone, but I felt like I could save the original wooden tree swing seat.
If you are starting from scratch, grab a piece of scrap wood and cut to your desired length allowing room on either end for rope holes.
How to Make a DIY Tree Swing
Step One
First, you want to sand the wood for your swing seat. I used my orbital palm sander to really clean up the old wood. It was super rotted and full of ants when I picked it up from its resting place under the tree.
If you're using new wood, I would still consider sanding it to avoid any unseen splinters on the seat.

I like the look of aged wood and wanted to keep to that patinaed look. It has a beautifully worn finish that comes with naturally weathered wood.
Step Two
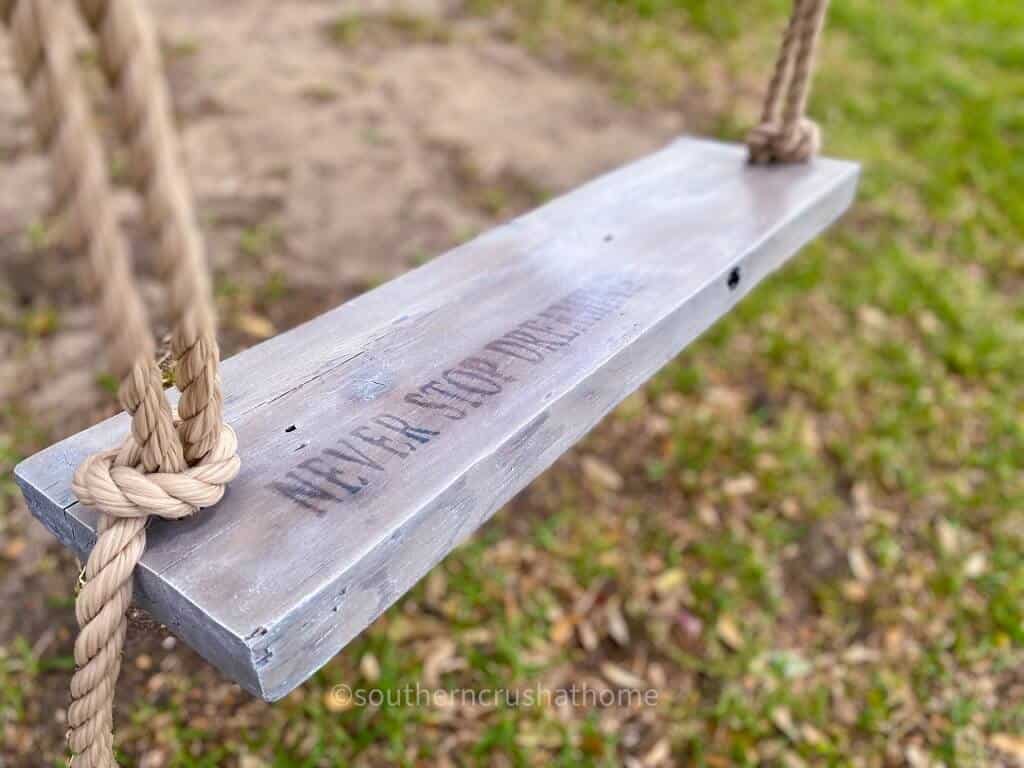
Now that the seat for the tree swing was splinter-free, I decided to add a sweet quote using my Cricut machine.
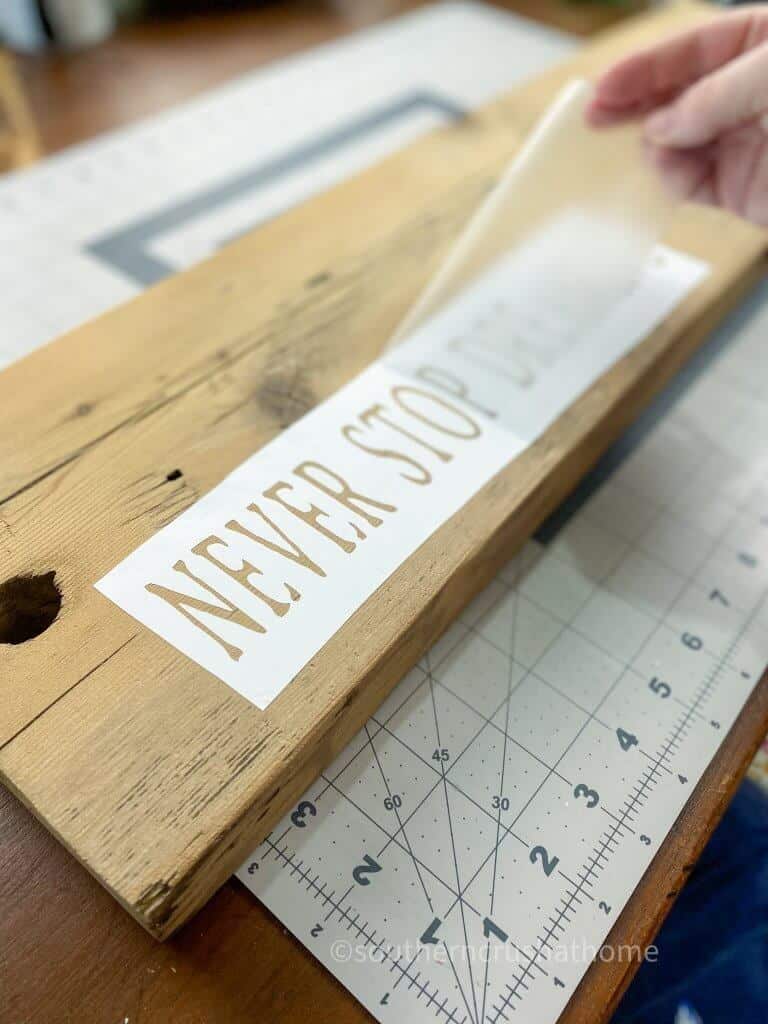
I made a stencil with “Never Stop Dreaming” and think it's perfect for an outdoor tree swing! What quote would you create for your swing?
Here are some other quote ideas for inspiration:
- Dare to be Different
- Never Grow Old
- Believe in Yourself
- Life is Good
- Live Simply
- Stay Fearless
- Follow your Heart
Step Three
Next up, I used my handy Scorch Marker to fill in the stencil. If you haven't tried this little tool yet, I highly recommend it. It can be used in so many different craft and DIY projects.
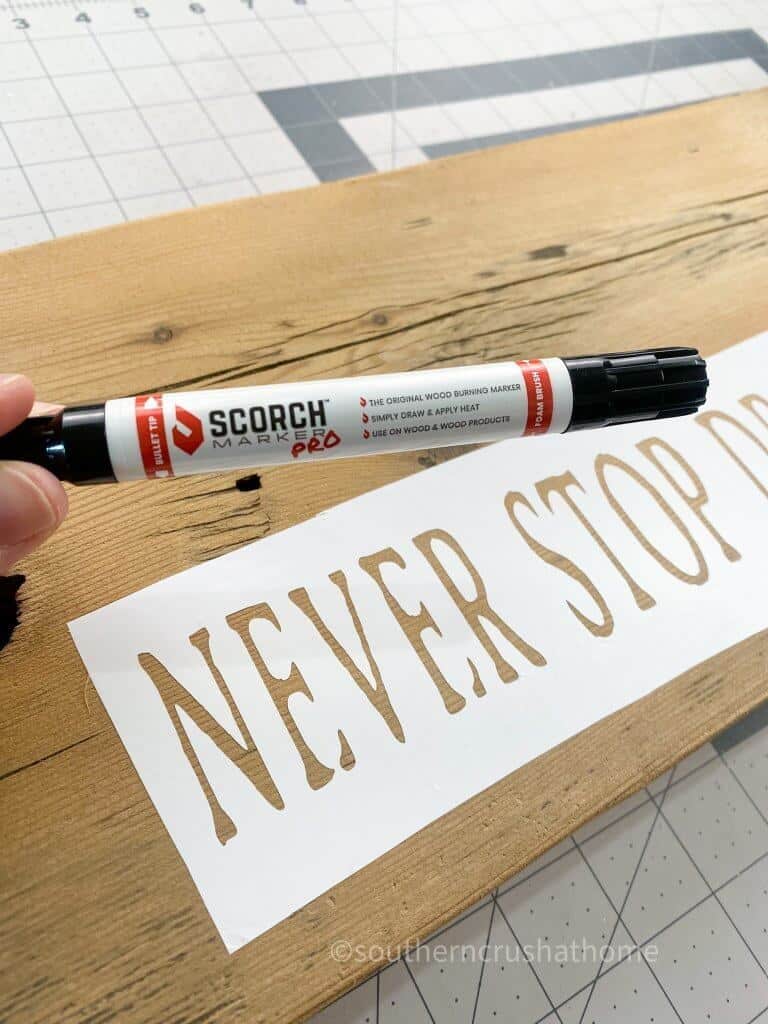
Simply use it like you would a marker and then apply heat with a heat gun. This handy tool makes it so easy to get that wood-burned look the easy way!
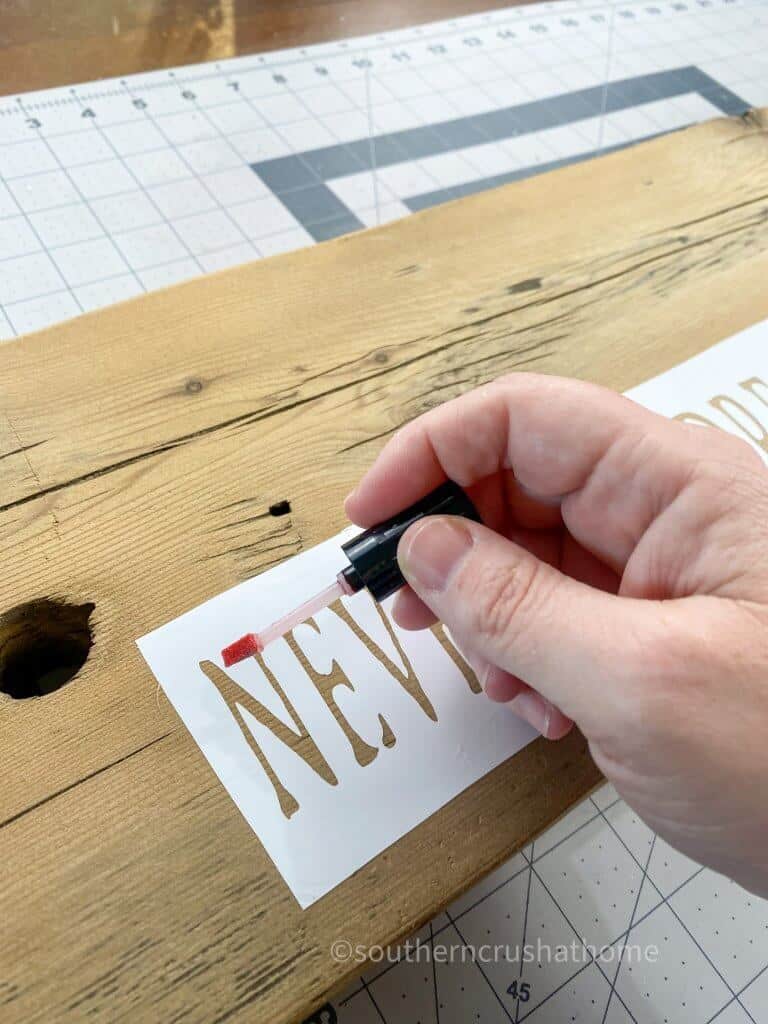
You can learn more about how to use a scorch marker in my embroidery hoop wedding wreath.
Step Four
Are you ready for the magic to happen? Use a heat gun to reveal the wood-burning effect. It’s really cool to see!
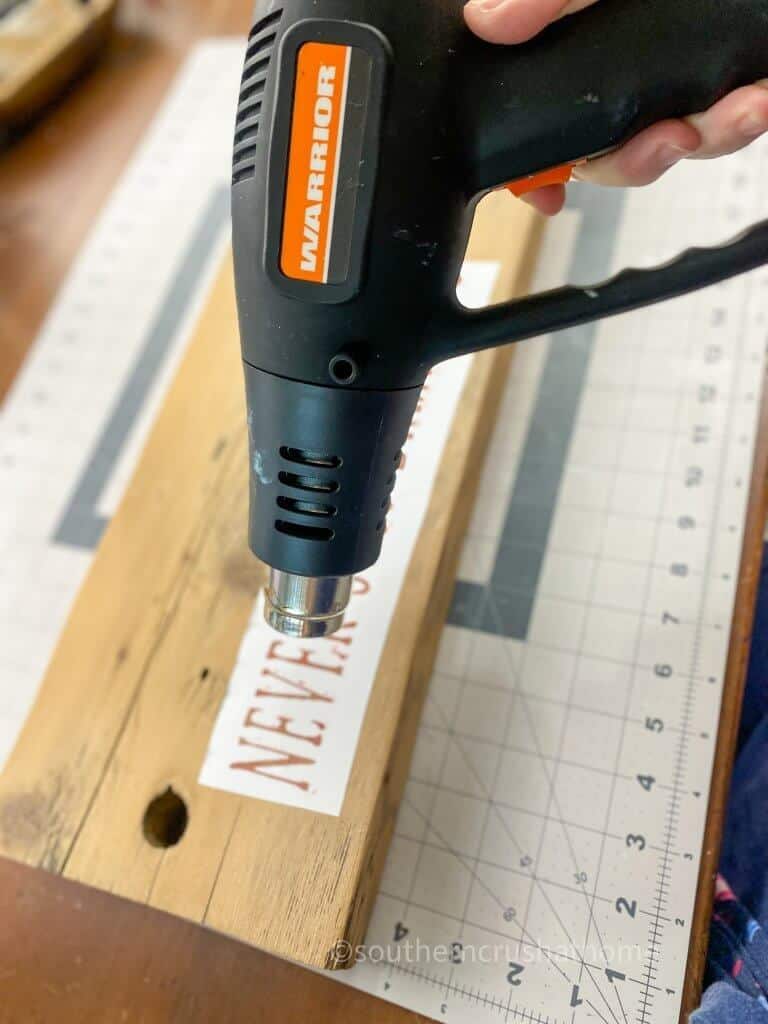
It is so much faster than using a wood-burning tool. Just think about all the DIY wood signs you can make. I see many more in my future using this little tool.

Slowly remove the stencil to reveal your beautiful quote.
Step Five
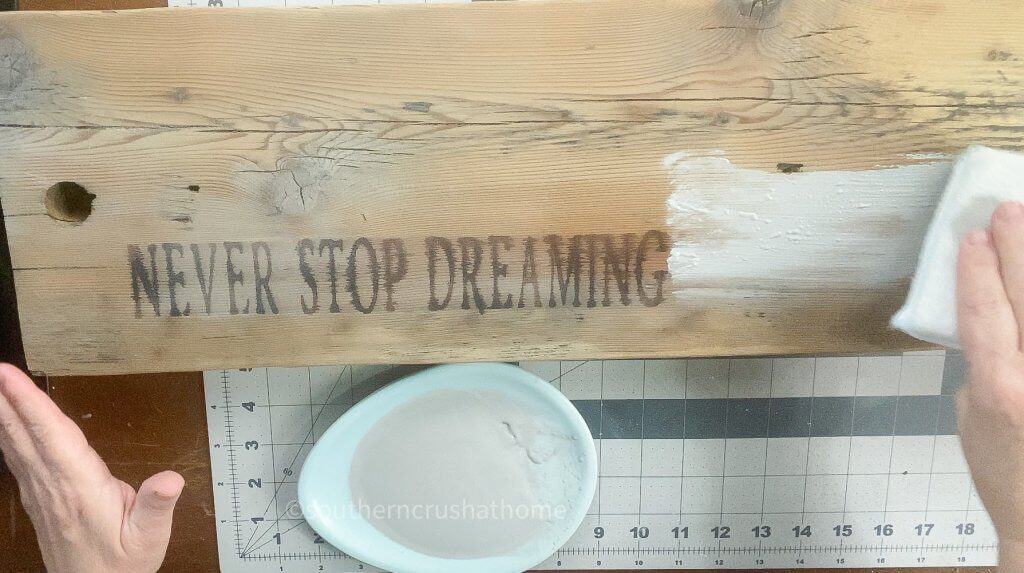
For the finishing touch, I applied a gray chalk paint wash using water and a sponge for a brush.
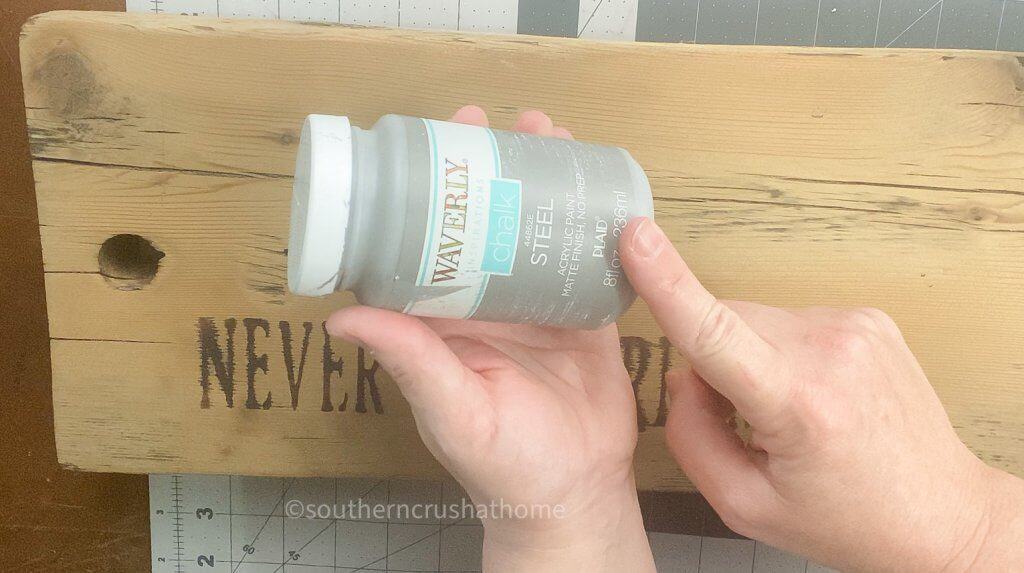
In order to create that gray weathered wood look, you don't want full coverage.
Start with a layer of water all over your wood surface. Then apply a light coat of the paint to get into the grooves of the wood to achieve that old weathered wood look that we all love.
Step Six
The gray paint won't take very long to dry, but you can also use your heat gun to speed it up if you want.
Once dry, go over the wood swing seat with a dry brush technique with white paint. To get that whitewash look you can wipe the paint on and wipe it off as you go with paper towels.
Simply play around alternating the white strokes and water as need to reach the look you want for your sweet tree swing!
Step Seven
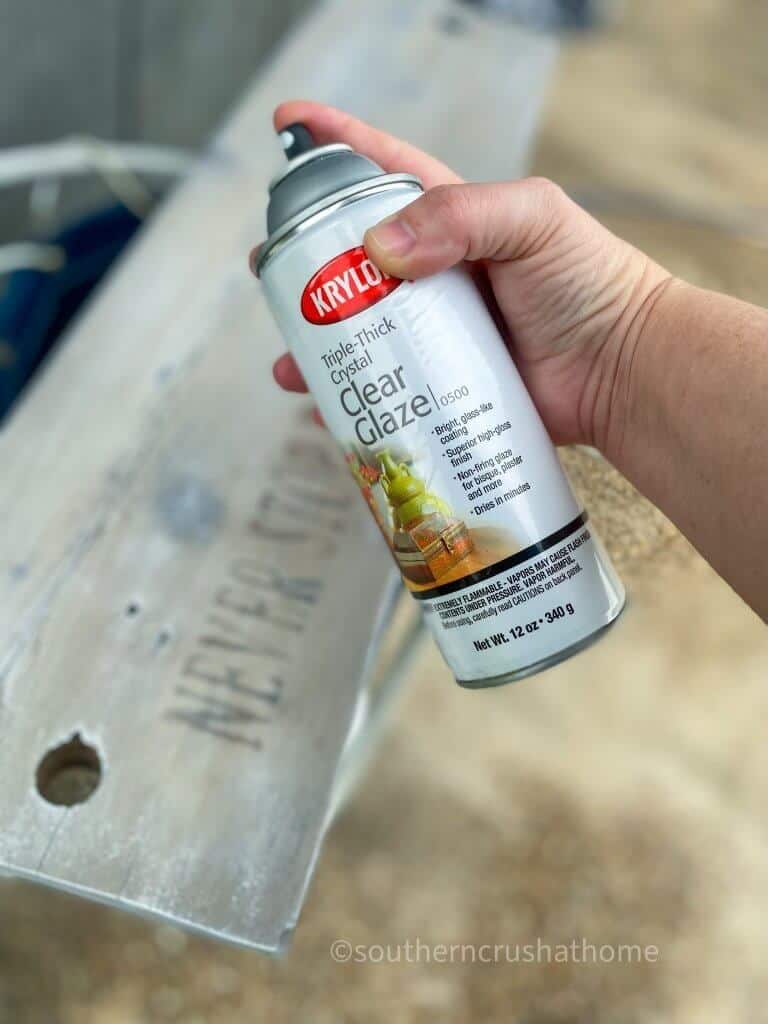
It's important to apply 2-3 coats of clear coat to protect the wood from the elements.
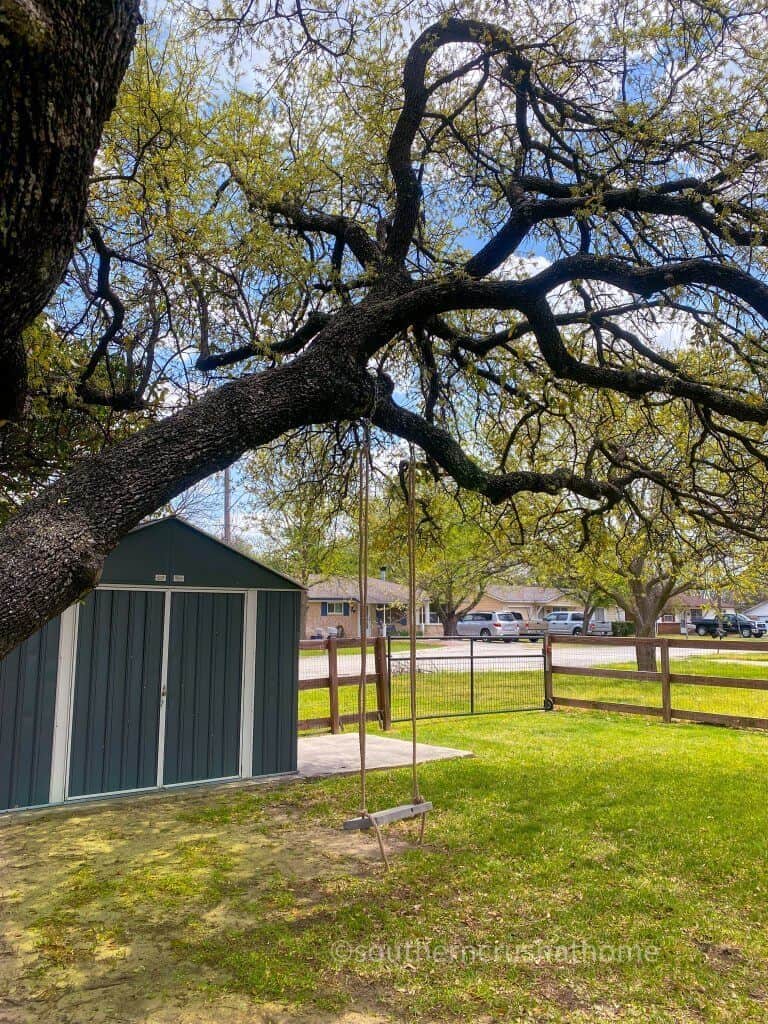
How to Hang a Tree Swing
Step Eight
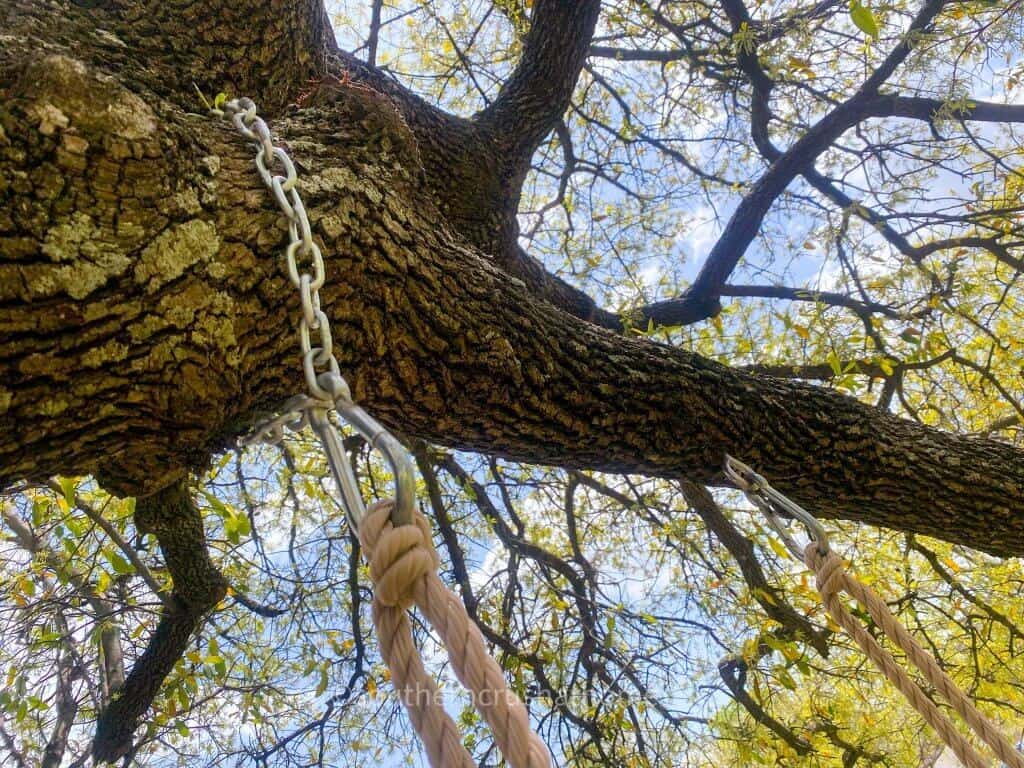
The last step is to apply chains around the tree limb to even out the length needed for your tree swing to be balanced. My tree took the chain and a carabiner on one side and only a screw hook with a carabiner on the other.
Secure the rope to your tree swing by threading it through the holes on either side and tying a knot. Be sure the knots are nice and secure. You may need to burn the rope at the ends to ensure they do not unravel.
Create another knot at the opposite end of each of the ropes and thread it through the carabiners at the top. I chose to use the additional rope to tie a knot back at the base of the seat, but this is totally optional.
I can't give you final adjustments for the length as it will be based on the height of your tree and how high off the ground you want the swing.
It's very simple to make adjustments to the chains and knots. This makes it great for kids too, as it can be easily adjusted as they grow.
Don't you love the gray-washed weathered look of this new tree swing seat? I'm loving it!
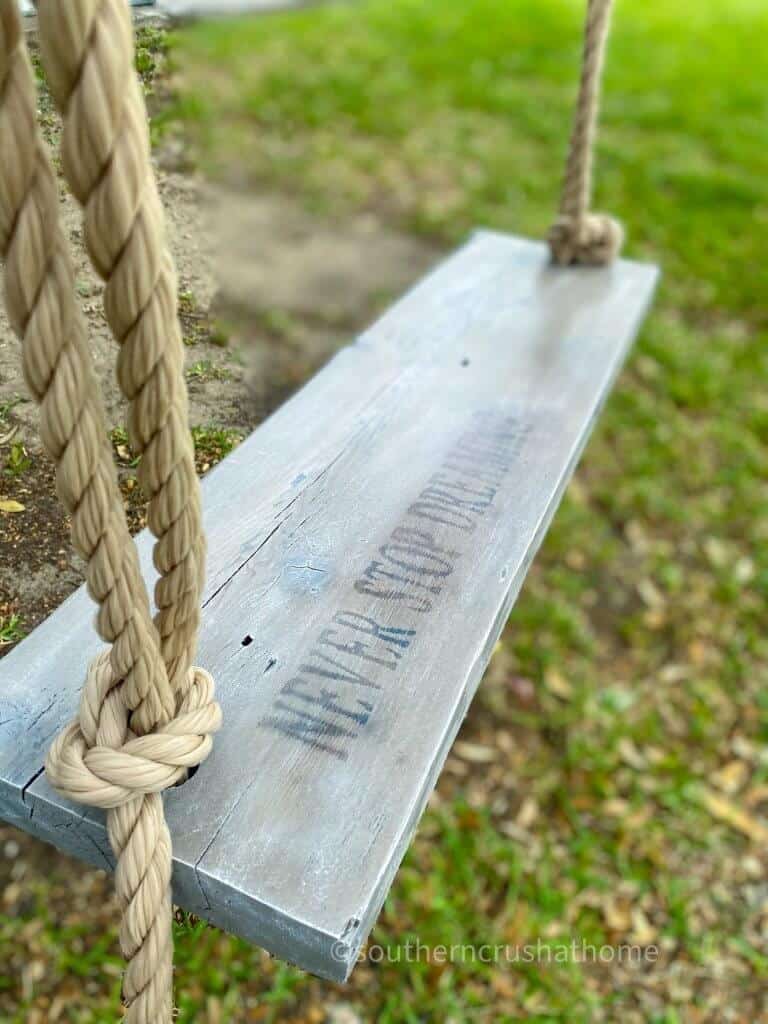
I'm pretty giddy to have this old swing back up ready for another season of enjoyment!
Tips on Hanging a Tree Swing
What's the best rope for a tree swing?
Probably the most important step in hanging a tree swing is ensuring that the rope is strong enough.
Here are the three most common types of rope for tree swings:
Polypropylene – This is the most common general-purpose rope. If you purchased a tree swing this was more than likely the rope attached. This is plenty strong for a tree swing. This is what I used.
Nylon – While nylon is the strongest common rope, it is very stretchy, which is not what you want for a tree swing.
Polyester – Probably the all-around best rope for a tree swing. It is extremely strong, has very little stretch, and is weather resistant. You can also purchase it in white, black or tan.
How to make a tree swing for adults and kids
Tree swings are surprisingly simple and inexpensive to make. Here are three simple steps to make a tree swing:
- Find the best area for a tree swing – there needs to be plenty of room around the tree for swinging or jumping off.
- Build the swing seat – the most common size used is a 4-foot long 2- x 8-in pressure-treated wood.
- Add rope holes – use a drill to create the rope holes.
- Sand the wood – prepare the wood with a hand sander making it nice and smooth.
- Paint or stain the wood – if you choose to leave it natural, you still need to add a clear coat to protect it from the elements.
- Hang the chains – measure and hang the chains from the tree adjusting the height as needed.
- Attach the rope – Tie secure knots on each end of the rope so the swing hangs about two feet off the ground.
What are the best trees for a tree swing?
It's important to choose a sturdy, hardwood tree for installing tree swings. Some of the most commonly used trees are oak trees, sugar maples, or ash trees.
You want to avoid pine trees or fruit trees as they are simply not sturdy enough.
How to hang a tree swing without a branch
If you don't have a tree branch that will work for a tree swing, no worries! You can also hang a swing from two trees that are at least 10′ apart.
You do need to make sure the trees are strong enough for a tree swing and weight requirements. In order to hang a tree swing without a proper branch, you need to secure a piece of wood in between the two trees to act as a header.
The swing can be attached to the wood header just like you would attach it to a tree branch. Genius!
Another option is to create the swing support between two trees using large straps, a small strap with D-rings on both ends, and two carabiner hooks.
How to Hang a Tree Swing
Equipment
- Palm Sander
Materials
- Scorch Marker
- Wood for Seat
- Gray Chalk Paint
- White Chalk Paint
- Cricut
- Rope
- Chains
- Foam Brush
- Paper Towels
Instructions
- Sand the wood for your swing with a palm sander.
- Create a stenciled quote using a Cricut Cutting Machine.
- Fill in the stencil using a scorch marker. Remove the stencil.
- Use a heat gun to create the wood-burned effect.
- Apply a gray chalk paint wash using a sponge brush.
- Go over the wood swing seat with a dry brush technique with white paint.
- Apply 2-3 coats of clear coat to protect the wood from the elements.
- Apply chains around the tree and secure the rope through the wood seat and attach it to the chains.
BE SURE TO CHECK OUT THESE OTHER OUTDOOR DIY IDEAS!
Creative Outdoor Patio Lighting & Curtains DIY + Patio String Light Ideas
Repurposed Headboard Garden Sign (with Buffalo Plaid Stencil)
Vintage Step Stool Makeover
Faux Concrete Planter DIY | How to Make a Modern Head Vase

Your tips on hanging a tree swing reminded me of when I hung a swing in my own backyard. We spent an afternoon measuring and securing it, and it quickly became a favorite spot for our kids and their friends. Thanks for the useful advice and for sparking such fond memories!
I hung a tree swing in our yard last spring! I followed a similar approach to make sure it was secure, and the kids have been enjoying it ever since. There’s something special about creating a simple outdoor spot that brings so much joy.
When we first moved to our house we currently live in there was a tire swing that my dad took down shortly after we moved in. I would love it if our house had a great place for one. I’ll have to show this to my sister. Her house has a more ideal yard for a tree swing.
Thank you! Hope it helps!