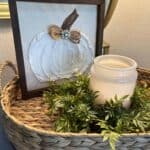
Easy Spackle Pumpkin Canvas Art for Fall Decor
Looking for a unique and affordable fall decor idea that’s not your average orange pumpkin? This Dollar Tree DIY spackle pumpkin canvas art project is a fun and creative way to use everyday materials to craft something totally custom for your autumn home decor.
Materials
- 1 tub of DAP Lightweight Spackle Medium
- 10 x10 white stretched canvas Dollar Tree
- Scissors
- Wood stain optional for frame
- Large spoon + small spoon
- Heat tool or time to let air dry
- Permanent marker or craft paint
- Hot glue gun + glue sticks
- Ribbon or bow of your choice
Instructions
Step One: Remove Canvas from the Frame
- Carefully use scissors or a craft knife to remove the canvas from the wooden frame. Take your time so you don’t accidentally tear or fray the canvas.
Step Two: Stain the Frame (Optional)
- If you want a rustic or finished look, stain the wooden frame using your favorite wood stain color. Let it dry completely while you continue with the project.
Step Three: Draw a Faint Outline of Your Pumpkin
- Use a pencil or marker to lightly sketch a simple pumpkin shape onto the canvas. Think basic curved lines—nothing fancy! This will help guide your spackle application.
Step Four: Apply the Spackle
- Using the back of a large spoon, scoop up a generous amount of DAP lightweight spackle and spread it onto the canvas within your outline. Create texture by swirling and layering it, just like frosting a cake. A small spoon can be helpful for tighter corners or details.
Step Five: Dry the Spackle
- You can either use a heat tool to speed up the drying process or let it air dry for at least 5 hours (or overnight for best results). Make sure the spackle is completely hardened before moving on.
Step Six: Add the Pumpkin Stem
- Once the spackle is dry, draw or paint on a pumpkin stem at the top. A brown marker or craft paint works great. You could even get creative and add leaf details or a little curl of vine.
Step Seven: Add a Cute Bow
- Attach a bow made from fall ribbon, burlap, or jute twine right at the top or stem area using hot glue. It’s the perfect touch of charm and seasonal flair.
Step Eight: Reattach the Canvas to the Frame
- Use hot glue to secure the painted and spackled canvas back onto the wooden frame. Press down firmly and make sure your pumpkin is centered.
Step Nine: Trim Any Excess Canvas
- If needed, trim any canvas edges that peek out from around the frame using scissors for a neat finish.
Step Ten: Display Your DIY Pumpkin!
- And just like that, your DIY spackle