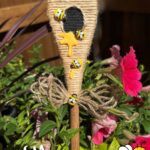
DIY Bee Skep Spoon Craft
This Bee Skep Spoon DIY is such a sweet little project to whip up for spring or summer—and it makes the cutest decor for your kitchen, a windowsill flower pot, or even a handmade gift. It’s simple, budget-friendly, and just whimsical enough to bring a little buzz into your seasonal decorating.
Materials
- Wooden spoon
- Wood stain
- Apple Barrel “Golden Sunset” yellow acrylic paint
- Black acrylic paint
- Jute twine
- Small decorative bumblebees
- Hot glue gun and glue stick low temp preferred for jute
- Paper towel or soft cloth for staining
- Disposable gloves optional but recommended
Instructions
Step 1: Stain Your Spoon
- Using a paper towel or soft cloth, apply your wood stain to the entire spoon—front, back, and handle. You can go as light or dark as you like. Let it soak in for a few minutes and then wipe away any excess.
- Pro tip: wear gloves to avoid staining your hands.
- Let it dry completely before moving on.
Step 2: Wrap with Jute Twine
- Grab your hot glue, apply a small dot to the handle about halfway down the spoon and start wrapping jute twine around the spoon.
- Wrapping upward, secure with small dabs of hot glue as you go. When you reach the top, start a new wrap from the very top of the spoon head downward, creating rounded shape. Continue until the two ends of the jute meet.
Step 3: Add the Bee Skep Opening
- Cut a small piece of jute and shape it into a little circle to resemble the skep opening. Glue it down toward the center front of the wrapped section of your spoon.
Step 4: Paint the Opening
- Using a small paintbrush, fill in the jute circle with black acrylic paint to give the look of an open hive entrance. Let it dry before continuing.
Step 5: Create the Honey Drip
- Using your hot glue gun, carefully add a little “honey” drip just above the jute wrap, letting the glue naturally form drip shapes down the spoon. Let the glue cool and harden fully before painting.
Step 6: Paint the Faux Honey
- Once dry, paint your hardened glue drips with Apple Barrel “Golden Sunset” yellow acrylic paint to look like drizzling honey. Let the paint dry thoroughly.
Step 7: Add Bumblebees
- Using hot glue, attach a few tiny wooden or plastic bumblebees around the spoon—on the jute, on the handle, even near the honey drips. Place them wherever feels cute to you.
Step 8: Add a Bow (Optional)
- For a final finishing touch, tie a small jute bow and glue it to the neck of the spoon. You can even add one more little bee right in the center of the bow for a little extra buzz.