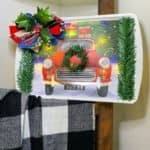
Dollar Tree Grill Pan Christmas Decor
The little vintage red truck that lights up is my favorite part of making this dollar tree grill pan decoration; although, I do love my signature "messy" bow that is used as well. The steps are easy to follow and you'll be amazed at how it will turn out...
Equipment
- scissors
Materials
- 1 Dollar Tree grill pan with holes
- White Acrylic Paint
- Glitter
- Mod Podge
- 1 Dollar Tree gift bag
- 1 Dollar Tree battery operated lights I used the flat kind
- Scotch tape
- Dollar Tree faux branches
- Messy Bow See this tutorial HERE
Instructions
- Paint the grill pan white or whatever color you choose. If not using chalk based paint, then two coats will be needed. You may like to check out my DIY Chalk Paint recipe here for a shortcut.
- Add a thin layer of mod podge onto the sections of your pan you want to add glitter. I did the ends.
- Sprinkle glitter lightly over your mod podged areas being careful to catch the glitter in a handy magazine underneath.
- Cut out the section of the gift bag scene you love most that fits the grill pan.
- Weave the battery operated lights through the holes in the grill pan and tape them down. The flat lights come in handy for this part.
- Glue your gift bag scene on top of the lights.
- Add faux branches to the sides of the grill pan as desired.
- Brush white paint over the branches if you desire a "snowy" look.
- Make an optional 'messy' bow for the grill pan decoration. See tutorial HERE.
