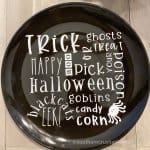
How to Make DIY Halloween Dollar Store Plate with a Cricut
Make an easy Halloween decor plate using a Cricut cutting machine.
Equipment
- Cricut Cutting Machine
Materials
- 1 Black Dollar Store Plate
- 1 Removable Vinyl
- 1 Weeding Tool
- 1 Transfer Tape
- 1 Smoothing Tool
Instructions
- First, choose the size you want your design to be.
- Next, you'll need to place your white temporary vinyl onto the standard gripping mat lining it up with the top left corner of the grid just as seen in the design space.
- Place the mat with the vinyl adhered into the edge of the machine.
- Go back to the computer and inside Design Space choose Vinyl as your material to have the Cricut Maker cut for you.
- Press the arrow keys on your Cricut Maker for the machine to adjust your mat placement and then press the Cricut button once it lights up.
- After the Cricut is finished cutting your design, carefully remove your vinyl from the gripping mat and cut out the shape that contains your design.
- Begin carefully removing the largest portion of your 'negative' space vinyl that is not part of your design.
- Carefully remove the additional portions of negative vinyl inside your lettering using your Cricut Weeding Tool.
- Next, grab your Cricut Transfer paper and cut out a square that covers your design and stick it to the front of your design.
- Carefully remove the transfer paper while keeping the vinyl design attached to it by removing it at the same time from the vinyl's paper backing.
- Find the center of the plate and place your sticky side down and smooth it over with your Cricut smoothing tool.
- Carefully remove the transfer paper to reveal your vinyl design