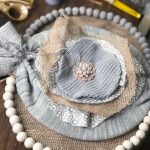
Splatter Screen Pumpkin
Make an easy DIY home decor out of splatter screens! This splatter screen pumpkin is a cinch to put together.
Yield: 1 pumpkin
Cost: $15
Equipment
- scissors
- large needle
- chalk type paint
- paintbrush
- floral wire
Materials
- 3 splatter screens
- 1 beanie
- 4 pieces scrap fabric
- 24 pieces wooden beads
- 1 foot hemp twine
- 6 inches regular twine
- 1 piece rhinestone bling or brooch
Instructions
- Glue the burlap piece onto two of the splatter screens in opposing directions.
- Trim the burlap around the edge of the screen.
- Bend the handles down on the two screens to be used for standing up your pumpkin and for support.
- Attach the two screens together using the floral wire. Keep in mind, you need them to be apart enough to make the sides of the pumpkin look correct.
- Cut up your scraps of desired fabric into circles each one bigger than the next.
- Take the circles and connect them by using the hemp twine and a large needle to sew them together from the center. Fold and pinch as you go to make a ‘rosette’ effect.
- Flip over the circles and sew them from the center on the back to create a ‘cinched’ effect.
- Flip back over and add your rhinestone bling brooch/piece by either pinning it or gluing it down to the center.
- Take your beanie and use it to cover your final splatter screen.
- Attach the final screen to other two screens as the center of the pumpkin using the floral wire.
- Cinch the top of the beanie and tie off with a piece of twine.
- Hot glue the ‘rosette’ you created to the center of the beanie.
- Take the wooden beads and string them onto the hemp twine to desired length for the edge of the screen. (this step is optional)
- Tie them off with another piece of twine.
- Hot glue your wooden bead strand down to the edge of the splatter screen and paint them your desired color once they’re in place. I found this method to be the easiest. If preferred you can always paint them first before stringing them.
- Take more twine and wrap around the handle ‘stem’ of your pumpkin, gluing down as you go.