Patriotic Front Door Decor: Easy DIY Paper Bag Flag
I'm sharing an easy DIY step-by-step tutorial on how to craft your very own patriotic paper bag flag--perfect for your front door decor.
Equipment
Materials
- paper grocery bag or paper sack or brown kraft paper
- red white, and blue acrylic or chalk paints
- painters tape *optional
- stars stencil aff link *optional
- polyfill
- scrap fabric
- floral wire
Instructions
- Step One
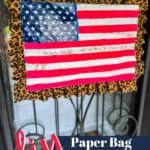
- Paint red and white stripes on the front of the paper bag. You can eyeball them or use painter's tape for more exact stripes. Then paint a blue square in the top left-hand corner. Allow to dry completely.
- Step Two
- Stencil stars onto blue square or use star stickers or hand paint stars. Although, traditionally, there are 50 stars, this is a craft, so you can get away with a few less stars.
- Step Three
- Stuff the paper bag flag with a bit of polyfill. Be careful not to over-fill it. You only want it to look puffy, not be a pillow.
- Step Four
- Seal up all of the flaps and opening on your paper bag with hot glue. Be sure not to miss any flaps, as this will help the flag to lay flat on your front door.
- Step Five
- Attach scrap fabric using hot glue around the outside edges of the paper bag overlapping every inch and a half or so to create a ruffle effect. So pretty!
- Step Six
- Attach a piece of floral wire to the back of your new patriotic front door decor flag using hot glue. Make the wire long enough to hang it in the center of your door.