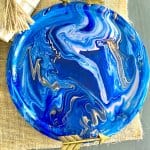
Easy Acrylic Pour Painting on a Dollar Tree Pizza Pan: Step by Step Tutorial
Who knew that you could turn a Dollar Tree pizza pan into a beautiful work of art? With this simple tutorial, you'll be able to create your own beautiful acrylic pour painting using a pizza pan from Dollar Tree. All you need is acrylic paint, a pouring medium, and a little bit of creativity!
Equipment
- heat gun
Materials
- dollar store pizza pan
- Ready to Pour Acrylic Paints
- acrylic paint in various colors
- pouring medium only if you're not using ready to pour paints
- plastic cup
- gloves
- 2 foil cookie sheets
- 2 plastic flower pots
- Resin Top Coat
Instructions
- Before you begin, you'll need to prep your workspace. Place two plastic flower pots to act as risers on top of two foil cookie sheets from the Dollar Tree. If you cannot locate these, simply spread out some newspaper or a drop cloth to protect your surface, and make sure you have all of your supplies within easy reach.
- Once your workspace is ready, it's time to prep the paint. If you are using regular acrylic paint, you will need to add a pouring medium per the instructions on the bottle. If you are using these super convenient "ready to pour" acrylic pouring paints simply begin adding them to your plastic cup one at a time. I like using a clear plastic cup to see the paint colors as they are added to the cup; however, this is totally optional.
- Now comes the fun part! Slowly pour out the cup of paint onto the pizza pan surface beginning in one area.
- About halfway through your paint pouring, drag the paint across the pizza pan to spread out the rest of the pouring paint.
- Once you're happy with the design, hit it with the heat gun for a few minutes and then set the tray back onto your risers to dry overnight.
- Using a two-part resin like this one, mix the resin and pour it out onto the dried acrylic paint surface.
- Use a craft stick to spread the resin out over the edges of the pizza pan and wipe away any drips.
- A heat gun is the perfect finishing touch to pop any pesky bubbles that pop up on the top of your resin.
- Once it is bubble free, set it aside to dry for another 24 hours.